We’re constantly being told it’s good to be outdoors as much as possible, both for our mental and physical health. Camping out as part of a larger group is always going to be more fun than on your own. To make the experience a positive one, it helps if you’ve got the best 14-person tent.
In this article, we’re going to review the following 14 person tents:
We’ve done all the legwork so you can get on with planning the rest of your group vacation. This well-researched list of the best 14 person camping tents is as follows:
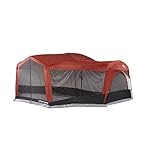
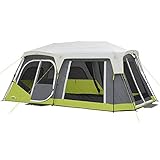
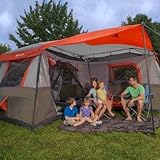
If you’re looking for a 14-person camping tent with a shared space, this tent from Ozark will feel like home. Ozark designed the tent in the shape of a plus-sign, and it takes up a massive 20 by 20-foot plot.
A common area in the center of the shape is surrounded on all four sides by separate rooms, each with their own entrance. These rooms also have two windows each, for improved visibility and ventilation.
There is, however, a minor flaw to this layout. It means you have to go through one of the sleeping areas from the shared area in the middle to get outside. One way to get around this issue is to use three of the rooms and keep the double-doored room as a spacious entryway.
Other features that get this tent to the top of our list include mesh storage pockets in each room, an E-port for easy extension cord access, and a media pocket, gear loft, and two gear hammocks.
You might think a tent of this size would take a lot of putting up, but the consensus is that it takes two people just 20 minutes. This might be because the pole elbows come pre-attached, so there’s no hunting around for various parts.
To provide stability during windy conditions, guy ropes act as additional stake down points. That being said, a few customers have mentioned that this tent isn’t overly stable during bad weather.
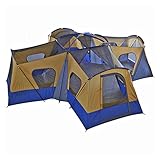
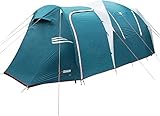
From the outside, this group tent from Tahoe Gear doesn’t look like it’ll fit 14 people. The floor space is smaller than the tent we’ve placed at number one, but the dimensions of 20 by 17 feet still allow ample room for up to 14 persons. There are only three rooms, but each has its own window.
The design of the tent is a T-shape, with two rooms either side of the double-door entrance and one extra room opposite.
This is another tent that’s quick to set up thanks to the easy-assemble shock cord poles. A factory-sealed rainfly has to be added over the top for additional waterproofing.
Tents made from polyester are great for both warm or cool weather. There’s no reason to restrict your outings to just a few short months of the year with this material.
If your group is comprised mainly of adults, you’re bound to appreciate the extra headroom in the center of the tent. The 6-foot center height means that most adults can enter the tent without stooping.
There are a few extra features that come with this 14-person camping tent, notably a welcome mat where the group can leave their soiled shoes, interior mesh pockets for valuables, windows that zip shut, and power slip.
You can say a lot of good things about this tent from Tahoe Gear. Like the Tahoe Manitoba, it’s well-made and reasonably priced, but there’s even more. If you want the best 14-person tent on a budget, you can’t go far wrong with this one.
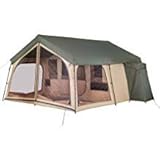
The design has three inner rooms that lead off the front entrance and screen room, and each has its own door to the screen room and the central space. The central space doubles-up as a living room and has a very generous height of around 94 inches.
The screen room at the front is also around 94 inches, but unfortunately, there are no panels to this area, apart from a fly.
Construction materials include polyester with taped seams to keep the weather at bay. The vertical poles are made using powder-coated steel, and the roof poles are shock-corded fiberglass. Not only will this make the tent last longer, but the corded poles make assembly much quicker.
What knocked this tent from the top of the list is that it’s very complicated to put up. The assembly instructions aren’t very informative, and many of the poles aren’t clearly marked. All that aside, once you’ve put it up a couple of times, it gets much easier.
Additional features include a tent trolley carry bag, power slip near the door, large zip windows, and solar shield to reflect sunlight and keep the tent cool.
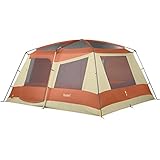
This is the best 14-person tent from Fortunershop. It’s made in onto our list thanks to the cool and funky design. Four doors provide a separate entry and exit to each room, and there are 12 windows for excellent visibility.
The taped seams provide excellent protection from the wet weather. You won’t have to worry about waking up in a damp sleeping bag or your gear getting wet.
The floor size is more than ample for 14 people, coming in at 20 by 20 feet. The center height is 78 inches, which means adults don’t have to spend all day crouching down. The central area also has a mesh room so you can enjoy your evenings together gazing at the stars.
Up to five queen air mattresses can fit comfortably into the three rooms, but you can also use it as one big room by tying back the dividers.
For easy access to an extension cord, there’s an E-port. Each room contains two pockets, so you can keep your possessions safe. There’s also a handy drinks holder.
If it’s a reasonably priced tent you’re looking for, then the Spring Lodge Cabin tent fits the bill. When it comes to budget tents, it’s surprisingly spacious. There might only be two rooms, but there’s the option of turning the screen room into an additional sleeping area.
For superior weather protection, the rainfly is seam-taped, but you can also roll it back to keep cool on hot summer nights.
One nice addition that seems to be a common feature with Ozark tents is the mud mat. There’s nothing worse than having nowhere to put your muddy shoes before heading indoors for the night.
The cabins each have divider curtains for privacy and multiple pockets for storage. To allow for extra room, there are two separate storage closets. This means you don’t have to clog up the sleeping areas with your larger gear.
Additional features include a slot to support the majority of electronic devices and a port to fit a power cable into the tent.
PROS
Fully floored screen room.
Two storage closets.
Easy to assemble.
Screened-in porch.
CONS
Only two sleeping rooms.
What to Look For When Buying a 14-Person Tent
Camping as a group can get very stressful if there’s not enough room. Space is one of the most crucial elements when choosing a 14 man tent, but there’s much more to it than that.
The main factors to take into account when choosing your 14-man tent are:
Ease of setup.
Comfort features.
Gear features.
Materials.
Climate and seasons.
Ease of Setup
Pitching a tent that’s big enough to house up to 14 persons won’t be easy. We’d be lying if we said it is. All that aside, most of the manufacturers in our list have done everything they can to make it easier.
Color-coded poles, lightweight components, assembly systems that are simple and shock-corded poles all help reduce the time it takes. Our number one tent, the Ozark Trail Base Camp Cabin Tent, takes things one step further by including pre-attached pole elbows. If you’ve ever been camping before, you know how frustrating it can be to search around for the right parts.
There is a small downside to ease of construction, and that’s the additional bulk some of these easy systems take up.
Freestanding or Not
A common feature of many modern tents is that you can pick them up off the ground and move them. There’s no need to take them down and put them up in a new location. Specially designed tent poles are used to hold up the tent, and tent stakes aren’t a requirement.
The tents on our list are all freestanding, although they might not be as easy to move as a much smaller tent.
Comfort Features
There’s no reason you should rough it just because you’re camping. A few creature comforts can make any tent feel luxurious. The Ozark Trail Base Camp Cabin tent is by far the roomiest, but the Tahoe Gear Carson 3-Season tent comes a close second thanks to the 7 feet of headspace.
Space
Multiple rooms are an obvious advantage of this type of tent; some even include cabinets and separate communal areas. There’s only one our list lacking in space, and that’s the Tahoe Gear Manitoba Family Outdoor Camping Tent.
It’s worth pointing out that manufacturers base a 14-person capacity on the number of sleeping pads that can be placed on the floor. Don’t expect to house 14 people sleeping on airbeds.
Entrances
A tent can’t have too many entrances, as long as you can securely zip them up. It’s also a good idea for entering and exiting not to interfere with other resident’s comfort.
This is one small downside of our number one tent, the Ozark Trail Base Camp model. If you make use of all four rooms and the communal area, you have to go through one of the rooms to get out.
Windows
Having numerous windows means more ventilation and light. Make sure the windows also protect from the elements with mesh plus zippered panels.
Gear Features and Storage
If you take lots of camping gear with you, it’s useful if there’s somewhere you can store it. While these group tents are spacious, keeping all the gear in your sleeping quarters isn’t ideal.
The Ozark Trail Spring Lodge Cabin Camping Tent has two storage closets, a screened-in porch and fully floored screen room. That should be plenty of space for any gear you’ve brought with you.
Keep in mind that a 14-man tent can still suit a smaller sized party. In fact, in this instance, you can use the extra sleeping areas to store your gear.
Materials
With so many people using the tent, you want the construction to be of the highest durability and to withstand the elements.
Waterproofness
For the best possible waterproofness, you need a tent with a thick floor and wall material, waterproof material and strong stitching in the seams. These will help your tent last a long time and be water-resistant.
The best materials for waterproofness include polyester and polyethylene. Neither of these synthetic materials need a special waterproof coating.
Durability
To help keep the tent in good condition, reinforced floors, zippered doors and large windows, and the use of high-durability materials is essential. Cotton and canvas are the best materials for durability, but they tend to be very heavy.
Most modern tents are manufactured using polyester or nylon. To improve their water resistance, you’ll often find coatings such as acrylic, polyurethane, or silicone.
Climate and Seasons
Tents of this kind are generally designed to be used during two or three seasons. Camping out in the depths of winter is not what they’re designed for. The height of the summer might also be ruled out unless your tent has a solar shield to reflect the sunlight, as the Tahoe Gear Carson model has.
Benefits of a 14 Person Tent
The most obvious benefit of a tent of such proportions has to be the size. Aside from this, there are several other advantages to choosing a tent with such capacity:
Gear space.
Elbow room.
Height.
Extra features.
Space for Gear
A 14-man tent has enough space to fit all a large family or a group of friends. Not only that, there’s typically space to stow any gear you might bring along.
A Little Elbow Room
14 people sharing one space might feel claustrophobic if it wasn’t for the extra elbow room afforded with a tent of this magnitude. The Ozark Trail Base, Tahoe Gear Carson 3-Season, and the Fortunershop Family Cabin tent all have an additional communal or screen room for extra space.
Height
If your group mainly consists of kids, then head height might not be a concern. On the flip side, if your group is made up of mostly adults, extra headroom would be appreciated. The tent with the most headroom is the Tahoe Gear Carson 3-Season option — 7 feet should be enough for anyone.
Extra Features
Additional features that make camping a little easier include E-ports, so you can use power cords for lamps, chargers and other electronic devices. Mesh pockets come in very handy for keeping small things safe.
Screened rooms are also a good addition. They can be great places to relax undercover, as well as being used for extra storage or an area for a dog bed.
A Quick Round-Up
The best 14-person tent is the one that includes plenty of space, ample headroom, four rooms and a communal space, and plenty of large windows for ventilation and light.
The Ozark Trail Base Camp Cabin Tent ticks all these boxes. Its construction is also of a high quality. The plus-sign design means that are four rooms with one communal area in the middle, and it provides 235 square feet of living space. There’s also a media pocket, gear loft, and two gear hammocks for any gadgets you care to bring along.
Coming in a close second is the Tahoe Gear Manitoba Family Outdoor Camping Tent, although some might consider it on the small side. There are, after all, fewer rooms than with our number one choice. That being said, there is a generous 6.5-foot center height, making it easy for you to move around inside.
Camping cots are a type of bed that collapses for easy transporting. They’re here to make your sleeping arrangements a lot more comfortable than sleeping on the ground.
They’re best for recreational camping or where you don’t hike from place to place, and if you just want to cut to the chase, our favorite is the Cam-O-Bunk with Organizers by Disc-O-Bed.
In this article, we’re going to review the following camping cots for two persons:
Having suitable sleeping arrangements while camping is essential, which is why we took extra care when choosing our top six. By following our criteria further below, we sieved through the mass to find the best.
Maximum weight capacity: 500 poundsItem weight: 36 poundsDimensions: 35 x 79 inches
This amazing cot by Disc-O-Bed is an innovative bunk bed design, where one cot sits above the other.
If you’re looking for something versatile, this is it — you can use it in various ways for different purposes. The compact size even makes it fantastic in the back of a camper van if you’re traveling by car. You can alter the setup in these cases, creating either a bench or two single cots.
The construction is sound and shouldn’t budge. It consists of rust-resistant, ultra-strong steel that can safely accommodate 500 pounds per single cot, making the total capacity 1,000 pounds total. As a finish, the steel is powder-coated for added durability and look.
Each cot includes high-grade polyester that’s water-resistant and easy to keep clean. For your comfort, Disc-O-Bed utilized contoured support, which means that there are no hard middle braces across the bed. Instead, the material stretches according to your body, creating a soft surface without you needing a mattress.
The cots each measure 35 inches wide and 79 inches long, which should be ample. To the side, you’ll have organizers for your equipment. Also, the bed is straightforward to assemble without using tools.
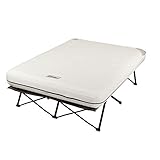
Maximum weight capacity: 600 poundsItem weight: 41.2 poundsDimensions: 78 x 59 x 22 inches
Sometimes, a cot just isn’t comfy enough, especially for recreational camping. This bundle from Coleman provides you with a camping cot and air mattress.
The cot is exceptional and has a steel frame that can support up to 600 pounds. To each side, there are built-in tables with cup holders that you can use for small lamps or books.
The air bed is wonderful, too. It’s a coil design, which conforms to suit your better, providing outstanding support. Coleman made sure that it wouldn’t leak through its factory-testing process to ensure firmness all night.
It opens up as a queen-size camping cot, measuring 78 by 59 inches with a 22-inch height. It keeps you well above the cold ground, and the bed and mattress are foldable for storing when not in use.
You can customize the mattress as you’d like. It comes with a removable, zippered cover that you can change as needed.
Included in the bundle is also an electric pump. It’s battery-powered, which is perfect for the outdoors. Note that the pump requires four D-cell batteries, and these aren’t provided.
PROS
Durable cot frame.
Airtight mattress.
Coil design that adjusts to the body.
Side tables on the cot frame.
CONS
Very heavy and cumbersome.
Using the cot without the mattress is uncomfortable.
Maximum weight capacity: 500 poundsItem weight: 42 poundsDimensions: 85 x 55 x 59 inches
Having everything in one package is fantastic when camping — this tent cot is innovatively designed, combining a sleeping cot with a tent for protection.
This oversized tent cot is very robust — it’s composed of a heavy-duty steel frame and durable Denier nylon.
You’ll appreciate how easy it is to set up — despite its complicated look, setting it up won’t take all day. The tent is roomy as well and includes a set of spreader bars that work to expand it, thus optimizing your interior space.
We’re amazed by the versatility, too. If you don’t want to use the cot, you can simply detach the tent and sleep in that, or vice versa. Included are also a roller-wheeled carry bag for the bed and a separate container for the tent.
The tent itself isn’t half bad. It consists of no-see-um mesh on the windows and doors, preventing even the tiniest pests from sneaking inside. The windows and doors feature heavy-duty zippers, and the cot will keep you off the ground, protected from cold, moisture and insects.
Maximum weight capacity: 450 poundsItem weight: 48.9 poundsDimensions: 79 x 61 x 24 inches
If you want full comfort, then we can only recommend the air mattress and frame from Ivation.
With a built-in pump, the mattress inflates automatically, which takes less than four minutes. The pump features different settings, allowing you to choose the firmness of the bed. You can pick between plush, medium or firm.
Another neat feature is the self-deploying frame. All you do is unzip the bag, plug it into an outlet, turn it on and then walk away. Within minutes, your bed is ready—excellent if you have impatient children with you.
The bed has fairly standard dimensions. It measures 79 by 61 inches and keeps you 24 inches above the ground. The airbed can support up to 450 pounds, but it’s considerably heavy, weighing in at 48.9 pounds.
Fortunately, the duffle bag included for transport has wheels. This way, you won’t have to break your back getting it from the car to the tent. On top of this, the bed deflates completely, making it easy to transport to the campsite.
Maximum weight capacity: 300 poundsItem weight: 24 poundsDimensions: 49.2 x 79 x 15 inches
With a lightweight design, this two-person camping cot from Outsunny is excellent for backpackers. The double bed is a portable design, which is quick to fold and transport.
The cot weighs approximately 24 pounds and folds into a compact package measuring 38.2 by 5.9 by 7.5 inches. Included is a carry bag so you can quickly wrap it up when you’re ready to go. The cots measure 49.2 inches in width, 79 inches in length, and they’ll keep you 15 inches above the ground.
This model is a side-by-side design with a maximum weight capacity of 300 pounds. It’s not the highest weight limit, but that’s a sacrifice for portability.
For materials, Outsunny used 600D PVC Oxford fabric, which is incredibly durable as well as water-and-tear-resistant. The frame features sturdy powder-coated steel with attached feet, providing some much-needed stability, even on uneven surfaces.
Maximum weight capacity: 550 poundsItem weight: 35.5 poundsDimensions: 85 x 55 x 19 inches
KingCamp has the perfect double cot for couples who need some extra room. The bed is wider and longer than the others on our list.
The bed measures 84.5 inches in length and 55 inches in width. Now, KingCamp admits that due to the middle bar, snuggling up with each other isn’t that comfortable. Because of this, it recommends that you use an air mattress.
Made with heavy-duty steel, the frame can hold up to 550 pounds. To support you, KingCamp utilized 1200D Oxford fabric, which is extra thick for higher durability.
In each corner of the cot are elastic bands to secure a queen-sized air mattress. This ensures that even during a wild night, the mattress isn’t likely to fall off the cot.
Another fantastic point is that it’s easy to transport. The cot folds down into a 45.5 by 11.5-inch package. KingCamp also includes a carry bag that features both two wheels and a handle. The bed weighs approximately 35.5 pounds, so it’s relatively light when compared to others.
PROS
Long and wide.
Durable fabric and frame.
Elastic bands to hold air mattress.
Relatively light and easy to transform.
CONS
Pungent smell puts buyers off.
Considerations for the Best Double Camping Cot
Ease and Speed of Setup
The gear you bring on your camping trip must be easy to use and assemble. You don’t always have several hours to get your bed ready, and a complicated model is a recipe for frustration.
Sadly, though, not all two-person camping cots are easy to assemble. We highly recommend that you look for a foldable design where assembly is minimal. With these, everything is already intact, and all you do is unfold it. It may take you a couple of minutes.
An excellent idea is to test the cot at home before you leave. Open it up and familiarize yourself with how it works. Then, when you arrive at the campground, you’ll look like a pro, and you’ve saved yourself a lot of tears.
Materials
With camping cots, we usually see two materials for the frame—steel or aluminum. For single beds, which aren’t supposed to accommodate two adults, aluminum is fine. However, for double cots, it’s best to aim for steel.
Steel is incredibly durable— it’s over two times denser than aluminum. A good steel frame won’t bend or warp when under pressure, as aluminum might do. With that said, the biggest con is how heavy it is.
Manufacturers will usually tell you about the frame materials and how much weight they can bear. Keep in mind that, if you’re looking for a portable cot, be prepared that you might have to sacrifice strength for portability. If you’re backpacking, it’s not ideal to drag a heavy bed with you, so you may have to opt for aluminum.
For the cot material itself, most manufacturers use either polyester or nylon. There are several types, and some are more durable than others. For this, however, durability generally comes with a higher price tag.
Airbed Mattress or Not?
Not all dual camping cots are comfortable to sleep on since many include middle bars for extra strength. If you’re either too tall or short, they’ll poke you all night — not fun!
For those with that middle bar, it’s probably best to invest in a compatible air mattress, too. Some manufacturers, such as KingCamp, recommend that you use its cot with an air bed for extra comfort.
Other cots, for example, the Cam-O-Bunk model we’ve chosen as our number one, have a particular fabric. This conforms with your body as you lay down, creating an almost hammock-like bed, and they’re very comfortable to sleep in.
Still, whether you should use an airbed mattress or not is entirely up to you. You may want to consider how you’re traveling. If you’re going from spot to spot, it’s probably best to leave the mattress at home. But for recreational camping, the added softness and comfort are highly appreciated.
Cot Weight
The camping cot weight should reflect on how you’re traveling. If you’re going backpacking, the weight of the bed should be a top priority. Loading up more than you can carry is a set up for failure and a sore back.
For recreational camping, where you won’t move between campgrounds, the cot’s weight has less significance. Perhaps consider how far you’d have to transport it from the car to the tent. Fortunately, some of the heavier models come with a duffle bag with wheels to alleviate transportation problems.
Extra Features
Originally, camping cots were the bare minimum — the next best thing from a sleeping bag, keeping you off the ground. Nowadays, many include features and gadgets to make your experience a lot better.
It, again, depends on your vacation and what your needs are. Many cots include extra storage spaces, pull-out tables and cup holders. Some even transform into a tent, like the Tent Cot with Rain Fly Kamp-Rite.
Others will also allow you to alter their design. A great example is the Cam-O-Bunk with Organizers by Disc-O-Bed — the cot can transform into a bench and a bunk bed.
If you’re going to sleep in a tent, you can easily stick to the bare minimum and save some cash. However, if you’re going to sleep under the stars, consider something with additional features, like a compatible tent.
Size
When it comes to size, focus on both the length and width.
Buying a cot that’s too short for you or your partner is extremely uncomfortable. Having your feet hang off the end and a metal frame poke you in the tendon isn’t ideal.
Most camping cots for two have a standard length of 79 inches. You may get lucky and find a longer one if needed.
For the width, it’s crucial that your shoulders aren’t broader than the frame. If so, the steel material will dig into your body, making you very uncomfortable. Furthermore, if you tend to move around while you sleep, you’re likely to fall out or push your cot-buddy over the edge.
Before you buy, measure yourself and then choose a few extra inches. For the width, it’s always an excellent strategy to go as wide as possible. Lastly, make sure you measure your tent — there’s no point in buying such a cot if it can’t fit in your accommodation.
Surprisingly, some two-person cots have a very low weight limit. This isn’t good, especially when two grown adults are using it.
A higher weight capacity also means durable materials that are likely to last longer. With the weight limit, it doesn’t hurt going as high as possible. This way, you’re sure it can safely accommodate you and your partner.
Remember that a higher weight capacity likely means a heavier product — take this into account when considering maximum load for traveling.
Conclusion
Investing in the best double cot for camping is a fantastic idea for ensuring comfortable living while away from home.
The clear winner of today is the Cam-O-Bunk with Organizers by Disc-O-Bed — it’s outstanding, versatile and sturdy, with the versatility being a feature the competitors don’t match. It’s also suitable for both adults, couples, friends and families.
For the runner up, we chose the Coleman Camping Cot for its included airbed-style mattress. It has some handy extras but didn’t quite match up to the versatility of our top choice.
When looking for the best camping cot for two, aim for something that’s easy to set up and take down. One that consists of durable materials and has a high weight capacity is a good focal point. Then consider the size and whether you can go big or if you’re tight on space.
Whether you’re towing along your family, or hosting a getaway with friends, choosing a roomy 12 person tent is an excellent choice. Regardless of how many people have to share it, you’ll have ample room to stretch your legs.
With this in mind, we’ve gone with the NTK Super Arizona GT for its roominess and excellent durability.
The best 12 person tents come with extra compartments than smaller models, providing excellent privacy. This works out fantastic, whether you have kids or are camping with friends.
In this article, we’re going to review the following 12 person tents:
A high-quality tent is imperative when going camping, so we took extra care when selecting the best 12 people tents. Taking into the key features further down, we managed to find our top seven.
Dimensions: 6.9 x 10.2 x 20.6 feetWeight: 39.77 pounds
NTK’s Super Arizona GT tent is perfect for families or couples who travel together. It offers spacious accommodation where up to 12 people can fit effortlessly.
When you first walk into the tent, you’ll notice how roomy it feels. You get 6.9 feet of headroom, two doors and three windows to bring in some natural light.
NTK included a detachable room divider. Attaching this inside the tent instantly creates two separate quarters for privacy. Around the tent’s interior are spacious utility pockets and a loft for gear storage, adding to this tent’s utility.
The tent is durable, too — NTK made sure it would protect from rain and sun. Covering it, you’ll have a rainfly composed of a double layer of polyurethane laminated polyester and a water column. This combination makes it fully waterproof and UV-resistant.
The interior consists of a layer of ultra-thin polyester no-see-um material — a special insect net preventing even the smallest creepers from entering.
For the frame, there are fiberglass rods, and to make the set up easy, you’ll have an aluminum pin-and-ring system. Lastly, the floor is a heavy-duty, anti-fungus polyethylene that works to keep water and moisture out.
The Tahoe Gear Prescott is a three-season tent, measuring 20 feet by 10 feet. If you’re taking the whole family on a trip, this tent is it.
On the inside, you have a spacious 200 square feet surface where up to 12 people can sleep comfortably. To maximize your sleeping space, Tahoe Gear recommends that you place all the sleeping bags at the center — you’ll then have room in the front and back for gear.
It’s an oval-shaped tent, so you don’t get the roomy L-shape, but the high ceiling makes up for that. At the tallest point, the roof reaches 6.5 feet, allowing almost anyone to stand up straight. Once erected, on all sides are large windows, bringing in natural light.
For the body and rainfly, Tahoe Gear used sturdy 190T polyester and a 1,200mm coating to make it rain and UV-resistant.
The setup is straightforward with shock-corded fiberglass poles.
If you’d like luxury while away camping, have a look at this tent by Tahoe Gear. It’s a weather-resistant tent, complete with a few surprises. We particularly like the panoramic view with windows all around, even on the roof.
Spacious is a generous word for this Tahoe Gear tent. You’ve got 7 feet of head clearance in most locations. The walls are tall, allowing you to move about freely without bumping your head or rubbing shoulders with others.
The body consists of a durable 1,200mm polyester fly, finished with fly seams. It protects you from both hot and cool weather. On top of the fly, the solar shield deflects sunlight, preserving a cool temperature inside. In addition, the polyethylene binding floor provides a water-resistant surface, keeping you and your gear safe.
If it should get windy, like on one of our most recent trips when we nearly blew away, you can secure the fly with heavy-duty ropes, which are secured from the inside.
Included in the bundle are thorough instructions as well as a carry bag.
If you’re searching for a tent that feels more open and spacious, Core has a fantastic example here. The 12-person straight wall tent gives you a roomy floor space of 16 feet by 11 feet with a 7.1 feet ceiling. You can easily fit four queen-sized air mattresses or several sleeping bags in there.
Core offers you two entrances — T and D — one at the front and the other in the back. This comes in handy when you pull up the space divider, as it gives each room more privacy.
When you remove the rainfly, you’re opening up a mesh ceiling, giving you a large sky window. This, along with the side windows, gives you a panoramic view of the surroundings.
Still, if the weather should get worse, the rainfly features H2O Block Technology, keeping you dry inside. On the warm days, however, the advanced ventilation system will draw in cool air from the ground. When it’s colder, close the vents to preserve the heat inside.
The exterior consists of 86D polyester with a 115 gsm polyethylene floor. The tent comes with 22 stakes to keep it grounded.
For summer campers, we suggest you have a look at this 12 people tent from Core. With a removable rainfly, you can enjoy a panoramic view, perfect for stargazing on a warm summer’s day.
To help you get through the hot summer, Core included an advanced ventilation system. This consists of vents near the floor that draw in cool air while pressing the heat out through the mesh ceiling. Don’t worry; when the weather is cold, you can close the vents, preserving the warm air inside.
For those who have less experience with tents, you’ll love the next feature. Core made sure the tent is effortless to set up — it comes with a special ten-leg pole design. The poles are pre-attached, so all you do is lift the tent, extend the legs and it clicks into place.
The interior of the tent is roomy. You’ll have a 6.7 by 10 by 18 feet floor plan where 12 adults can sleep comfortably. In the middle, you can zip up the room divider, giving you two private areas, each with their own entrance.
Core also made sure that no water seeps in by heat sealing the seams from top to bottom.
If you’re heading out with friends and are looking to preserve your privacy, we highly recommend the Copper Canyon. Eureka has your privacy in mind by including two rooms in this 12-people tent.
Included in the bundle is a detachable divider curtain that transforms the Copper Canyon into a two-room tent. The interior feels spacious with almost vertical walls, so there’s plenty of room for cots or airbeds. In all, you’ve got 7 x 12 x 14 feet of space, so it isn’t the largest tent in this feature, but it’s still spacious.
A remarkable feature is the E! Power Port, which allows you to bring an electrical power cord into the tent. You can use it to charge your phone or lights. This combines well with multiple storage options with pockets and gear lofts.
Another aspect that we appreciate is the six large windows. These provide a 360-degree view as well as natural cross-tent airflow. When you need privacy, you can zipper them closed.
The Copper Canyon tent is easy to set up. It features a clip, pole sleeve and a ring/pin assembly that’s straightforward, even for a tent novice. The only issue we’d like to mention is that it’s not 100 percent waterproof.
For campers who don’t have hours to set up their camp, we found this 12-people tent from Ozark Trail. With a super easy setup, Ozark Trails boasts that you can have it ready in under two minutes. Perhaps this is a bit of a long shot unless you’re an expert, but it’s nonetheless a straightforward process.
All the poles come pre-attached, so all you need to do is open and extend. Once unfolded, you get to see just how spacious it is. Ozark Trail promises a 6.8-foot central height with windows on all sides.
The interior can easily fit three queen-sized airbeds or up to 12 sleeping bags. You can divide the floor using two room dividers, giving you three separate spaces total.
You can comfortably camp out during the summer thanks to the ventilation system. Inside, there’s a vent near the floor, drawing in cool air from the ground. You could also fit an air conditioner.
Also included are a rainfly and carry bag. To keep moisture out, the manufacturer used fully taped, factory-sealed seams. This combines well with the durability of the 6-inch thick, tub-styled material floor.
PROS
Effortless to set up.
All-around windows.
Room for three queen-sized airbeds.
Moisture-proof.
CONS
Not enough storage compartments.
What to Consider When Finding the Best 12 People Tent
Ease of Setup
One of the most crucial points to consider when choosing a tent is how easy it is to set up. A complicated setup means lots of frustrations.
When it comes to tents, you’re generally met with a choice between freestanding and non-freestanding.
The tents on our review list are non-freestanding. Some, including the Two Room Tent by Core, are specially designed to make set up easy. It works similarly to a freestanding tent, but with the security of stakes.
Freestanding Tents
Freestanding tents are those that don’t require any stakes in the ground. They have pre-attached poles, making them easy to set up. Because there are no stakes, you can easily pick them up and move them. However, they aren’t as safe in windy conditions.
Non-Freestanding Tents
Non-freestanding tents are the old-fashioned ones, where you’ll need ropes or cords attached to stakes that secure them to the ground. They’re generally more weatherproof and are lighter to carry. They can, however, be cumbersome to set up.
Comfort Features
Tent Size
With tents, you’ll have to provide the sleeping arrangements, for example, a sleeping bag or air mattress.
So when it comes to your comfort, the focus on the size. Even though all the tents we feature can house 12 people, not all are equally spacious. If you’re going to travel with several people, you need extra room.
Think about what you’re using to sleep in — are you bringing queen-sized air mattresses or simple sleeping bags?
Amount of Rooms
It may sound crazy if you aren’t used to large tents, but many do offer two to three rooms. The manufacturer will include a room divider that you can attach in certain areas for more privacy.
Sometimes, they’ll give you one large space and a smaller one, which is excellent if you’re hauling extra gear. If you’re traveling with coupled friends, we highly recommend looking for room dividers. This way, everyone can have their private space without being totally separated.
Windows and Views
Tents can often feel confined and closed off, so having a window or two helps open up the space.
Fortunately, most 12-person tents come with large windows. Many even have a mesh window on top, like the Gateway Deluxe Cabin from Tahoe Gear, allowing you to watch the night. During the day, you can enjoy the fresh air and daylight.
If, however, you choose a tent with a mesh roof, ensure that it includes a rainfly, or that you can find a compatible one. Mesh won’t protect you from rain or strong winds.
Ventilation
If you’re planning on camping out during the summer, look for a good ventilation system. If the tent has windows, then that’s fine. However, some include a special design, where vents pull cool air in from the ground. It then pushes out the heat, creating a comfortable atmosphere.
Keep in mind that heat exhaustion can easily occur, especially after a day walking in the sun.
Gear Storage Features
Having a designated spot to place your gear is excellent when living in a tent. Sadly, it’s not always fulfilled — not all tents include pockets or other places for equipment.
During your search, pay attention to how many pockets and storage spaces the tent offers. Some, such as the Copper Canyon tent from Eureka, offer a suspended storage “loft,” which is a mesh pocket extended from the ceiling. These are fantastic for storing items, including pillows or clothes.
Weatherproof
The best weatherproof tents are those that include a protective layer keeping you safe from rain and UV rays.
Many 12-people tents have something called a rainfly. This is an additional layer that you attach to the top to protect the interior.
To avoid waking up in a puddle, look for durable, waterproof floors. Some tents have a tub-styled floor, which is fantastic for keeping the moisture out. But, of course, always be smart about where you place your tent.
Climate and Seasons
Do you need a tent that you can use all year round, or are you only going to travel during specific months? Not all tents are suitable for winter use — all on our list are best suited for three seasons: summer, autumn and spring.
Benefits of a 12-Person Tent
Space for Gear
With a 12-person tent, you’ve lots of room to spare, even if there are 12 of you. These tents often have individual storage compartments or even entire rooms dedicated to gear.
A Little Elbow Room
You don’t have to be traveling 12 people to enjoy this type of tent. They’re usually recommended for folks who enjoy having that extra elbow room. They add some luxury to camping since you have a mini house to live in.
Tall-Person-Friendly
12-people tents almost always offer ample head clearance — most will give you at least 6.5 feet.
A little pro tip: look for vertical walls if you want extra height. Vertical walls automatically give you more height than slanted ones.
Extra Features
Many 12-person tents come with a few extra features. These generally include one or two room dividers, panoramic views, advanced ventilation systems and spots for electrical cords to enter the tent.
Conclusion
Whether you’re going away with a group or love your elbow room, a 12-person tent is a fantastic investment. Today’s clear winner is the Super Arizona GT up to 12 Person Tent by NTK because not only does it offer space, but it’s weatherproof and durable, too.
For our runner up, we chose the Tahoe Gear Prescott for how easy it is to set up and large windows for that panoramic viewing. It’s also one of the most visually attractive 12-man tents on the market.
When choosing your tent, consider how much space you’ll need — some tents are more spacious than others. Combine this with the extra features and especially whether it’s weatherproof.
Flat feet can make any activity painful and hiking can be strenuous even for athletic individuals. But with the proper footwear, there’s no reason that you should suffer while performing your favorite outdoor activities.
When choosing a good hiking shoe, you need to consider the following factors: arch support and stability, materials, waterproofness and weight.
Our top 9 picks for hikers with flat feet include:
The Vasque Men’s Mantra 2.0 has earned itself several outstanding reviews for its stability and traction. The XSTrek multi-directional lugs prevent slips and slides in the most technical and difficult terrain.
Despite that, this innovative sole technology doesn’t quite improve traction on ice or snow. Be careful that your stability on dry surfaces doesn’t lead to overconfidence on wet ones.
This hiking shoe does prove itself waterproof, though. It keeps feet dry and warm, yet the leather construction is still breathable.
The shoe comes up short when it comes to comfort. Stiff material and a narrow base could be a dealbreaker if you have wider feet. If you plan on long hikes, make sure you break in these shoes first.
If you’re one of the many hikers who are prone to sprains or rolled ankles, the Mantra 2.0 offers superior ankle stability. This is helpful to counter the extreme traction that it provides. You can take this shoe hiking with confidence that your joints will make it home safely.
For a competitively low price, the Vasque Men’s Mantra 2.0 offers a lot of advantages for serious hikers.
Merrell’s Moab 2 is a great follow-up product to the brand’s initial Moab hiking boot.
Most shoes take a few days to adjust to your feet, but the Moab 2 provides immediate comfort and a snug, padded fit right out of the box. The superior flexibility and cushioned collar and tongue will get you out on the trail in no time. An air-cushioned heel helps with shock absorption.
Although it’s much more stable than a running shoe, the Moab’s committed to comfort. This makes it more prone to rolling than other hiking boots on the market. The best hiking boots for flat feet have stiffer soles and collars to prevent overpronation.
The shoe does have a new innovative feature: two silicon bands along the interior and anterior sides to add structure and support.
Its Vibram rubber sole remains unchanged, which was a smart decision. It already boasted a long lifespan with superior traction in a wide range of terrains, with 5 millimeters of lug depth.
The leather/mesh construction gives the boot more breathability rather than waterproofing. You can count on this shoe to keep your feet cool but not necessarily dry.
The Salomon Quest 4D is another excellent choice in the best hiking boots for flat feet. It’s well-suited for backpacking with heavy loads, with additional sole cushioning to handle the extra weight.
Salomon’s unique ContaGrip soles offer exceptional traction in wet and slippery terrain, making it ideal for winter hiking. Be warned: this breathable boot doesn’t retain heat very well. We recommend thick winter socks if hiking in the snow.
The company boasts about this boot’s durability, but customer reviews disagree with this claim. In particular, the fragile shoelace eyelets appear to be a point of failure for many consumers.
Most buyers generally have great things to say about this boot’s GoreTex waterproofing. Many reviews claim that the Salomon Quest 4D offers one of the driest and safest winter hiking experiences possible.
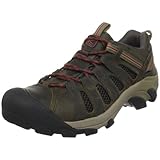
The KEEN Voyageur is a reasonably-priced option for outdoor hiking. It’s recommended for its immediate fit and surprisingly roomy toe box.
Toe mobility is an often overlooked comfort issue when evaluating hiking boots. Several users found that it’s so spacious that they had to comment on it. The wide toe box makes it nearly impossible to form those pinky toe blisters that are aggravating while hiking.
This shoe model has great heel support, but its arch support is inferior to other shoes on this list. It’s critical for flat-footed hikers and walkers. The footbed tries to make up for this by increasing the heel cushioning.
This particular shoe lacks durability. Several online reviews featured photos of separated soles and tattered interior lining.
If you’re concerned about traction this brand fits your needs. Multi-directional lugs and torsion stability are both great features on this shoe.
The low price is an appreciated feature, as well, making them easily replaceable when they wear out. This shoe comes in the widest variety of colors and styles. If you’re a fashionable hiker, you’re sure to find a model that matches your attire.
The North Face Hedgehog Fastpack GTX is another affordable option with great reviews. Light, cheap, comfortable and durable were the most common accolades.
Although this boot takes some time to break-in, its low cut and flexibility provide great overall comfort. It does have a narrow fit, though. If you purchase these boots, we recommend that you spend several days in them before taking them hiking on the trails.
This shoe was one of the better waterproof options available. They should keep your feet dry with maintaining breathability, thanks to the proprietary GoreTex material.
Note that insoles in this boot were found to provide poor arch support. The design focuses on the comfortable low cut ankles instead. If you have very flat feet, this could be an issue for you.
Still, we can certainly recommend this hiking boot for its light weight and affordability. Weighing in at under 2 pounds, this is a great option for casual hikers with well-formed foot posture.
The Merrell Women’s Moab 2 is a great budget option for casual female hikers. Like the men’s model, customer reviews indicate that this shoe provides a great fit and snug comfort right out of the box.
A disadvantage is that it seems that this shoe isn’t watertight. If you’re planning to go hiking in wet regions, you would be better off with another brand.
A beautiful suede and mesh construction provides excellent breathability, keeping you cool during the hot summer activities. The air cushioning makes the shoe comfortable if you’re planning for long days on your feet.
This cushioning could be insufficient if you’re doing heavy-duty backpacking with large loads. Customers who wore these shoes for that purpose found that the cushioning wore out quickly in those situations.
These shoes weigh in at 2 pounds. This is close to the median weight for men’s hiking boots. Women with smaller feet and less muscle density might consider them uncomfortably heavy.
Despite these drawbacks, the Moab 2 has an attractive price tag and is well-suited for a casual outdoorswoman.
PROS
Comfortable and cushioned.
Breathable.
Reasonably priced.
CONS
Insufficient support for hikers with heavy backpacks.
New Balance has a strong reputation for shoes that cater to your unique feet. Whether flat-footed, over-pronating, wide or narrow, this company has a model for you. Unfortunately, this particular footwear is in the upper price range for the best hiking boots for flat feet.
Multiple buyers appreciated the superior comfort of these shoes, especially right out of the box. You should be cozy all-day long, without any need for a break-in period.
Although the manufacturer doesn’t specify the weight, online reviews praise its lightweight construction. Suitable for daily use as well as trail hiking, the shoe won’t drag you down.
The soles don’t offer the traction and stability that you might expect from a hiking boot. You’ll find that the treads are less aggressive than desirable, with shallower lugs.
These shoes are warm enough to handle winter hiking and outdoor activity. With Thinsulate insulated linings, they’re proven to keep your toes warm.
Many buyers reported that the shoes didn’t fit as expected, so you may want to try them on before committing.
Despite having a brand name that could command high prices, Timberland brings us a very affordable hiking boot for women. It’s light and comfortable, and the leather design is great for an all-purpose option.
First of all, this boot sacrifices little in the way of comfort and warmth. The all-leather exterior is waterproof and still offers air ventilation. Furthermore, the padding on the tongue and collar are easy on the footbridge and ankles.
Not only is the boot waterproof, but Timberland went the extra mile by making all of the metal fasteners rust-proof. So, there’s no need to worry that those puddles will damage your footwear in any way.
The ankle support is somewhat weak, making this boot suitable mostly for light hiking or daily use. You’ll be impressed with the superior traction provided by the multi-directional lugs and rubber soles.
A few customer reviews have claimed that the boots don’t live up to their expected lifespan, with frequent sole delamination. But for the price, replacement isn’t a deal-breaker for continued comfort and style.
The Merrell Men’s Chameleon 7 Stretch is an excellent everyday shoe that also performs well on the trail.
There’s a Vibram TC5+ outsole, offering exceptional traction on both trails and smooth surfaces. This gives the wearer confidence while hiking or just daily walking. Keep in mind this outsole squeaks rather obnoxiously on most indoor surfaces, if that bothers you.
This shoe has excellent breathability, while the leather/textile outside offers decent waterproof protection for your flat feet. The toe box is wider than most other models, which your blister-free toes will appreciate.
One thing that diminishes the exceptional comfort of these shoes is the arch support, which is substantially higher than others. However, for very flat-footed hikers, this is exactly the kind of support you want.
PROS
Great traction.
Breathability.
Comfortable toe box.
Magnified arch support.
CONS
Weak durability.
Buying Guide
For your convenience, we’ve identified the essential factors in choosing the hiking boots for flat feet.
Looking for further tips? Check out this video.
Support and Stability
Without stable footing, you won’t make it very far in the hiking world. A few factors that play into this are:
Arch and Ankle Support
Flat-footed customers need solid arch support, especially for hiking. This usually comes through insole materials, but manufacturers often build it into the shoe’s external shape and construction.
Ankle support is another valued quality for hiking shoes. When you’re hiking across uneven or slippery terrain, this will prevent injuries. If you’re prone to rolled ankles or sprains, high-cut boots with stiff shafts will protect you best.
Although they might cause some initial discomfort, the Merrell Chameleon 7 Stretch offers the best for arches. The Vasque Mantra 2.0 provides quality ankle support among the footwear in this article.
Fit
“Comfortable fit” is a subjective quality. Customers with feet of different shapes and sizes might have radically different opinions about a shoe’s fit.
In general, we measure this quality by the roominess of the toe base and the wideness of the shoe body. The shoes reviewed in this article are also rated by how accurately they match with the manufacturer’s advertised sizes.
Most of the hiking boots received great reviews regarding their comfortable fit. The only models that had negative comments were North Face, Vasque and New Balance.
Footbed
A shoe’s footbed is determined by the shape and material used for the insole. Innovative fabrics such as TPU foam or gel padding can provide comfort during long periods of walking.
Additionally, the shape of the insole is what provides most of the necessary arch support for flat feet. The Keen Voyageur and the Vasque Mantra 2.0 both have technologically-advanced footbeds.
Cushioning
The insole and heel formation both contribute to cushioning. This is especially important for heavier hikers, or those with large backpacks.
Newly developed insole materials can improve this feature. Manufacturers also use air or gel pockets in the heel to provide more comfort.
Merrell seems to have the most consistent cushioning and heel support, in both the Men’s and Women’s Moab 2 models. The Salomon Quest 4D is another notable option for this.
Materials
Terrain and breathability are two of many factors that play a role in the best materials for hiking boots. This will be up to personal preference, where you’ll be hiking and what the weather conditions are at the time.
Sole
A rugged, durable sole is critical for a hiking lifestyle. You’ll want to opt for deep lug depth to get that traction on gravel and dirt.
Additionally, the best hiking soles will have multidirectional lugs. These will prevent slippage in every direction, which is a key benefit when walking on uneven ground.
Salomon, Vasque and Merrell Chameleon all have technologically-advanced sole materials. While the Salomon may have the edge on wet surface traction, the Vasque Mantra 2 probably has the overall superior sole that includes multidirectional lugs.
Exterior
Depending on your personal material preference, any of these shoes might fit you best. Most of them are made with a leather/mesh combination.
The exterior material also determines its waterproof quality. The best shoes in this article feature GoreTex coating on the shoe exterior.
One shoe stands apart from the rest, which is the Timberland White Ledge. It’s the only 100 percent leather option and you can’t go wrong with that.
Interior
The interior of the shoe is what provides a comfortable and warm fit. If you’re planning on doing any hiking during the winter, this is essential. Look for shoes that are well-insulated with soft, comfy material.
You should try to find a hiking boot with a moisture-wicking fabric inside, such as nylon or polyester. During the hot summer, your feet will sweat and this will greatly improve your foot comfort.
The New Balance WW1400 takes the cake in this category, with not only a waterproof inner membrane but Thinsulate insulation inside to keep your toes warm.
Waterproofness
Nothing is worse than getting your feet wet while hiking. Not only is it cold and uncomfortable, but wet feet can be prone to blisters during long walks.
Many manufacturers waterproof their shoes with GoreTex lining or exterior finishes. This leads the way in weather-proof outdoor materials.
Salomon, North Face and Vasque all included GoreTex waterproofing in their boots and New Balance was the other model that received great reviews for its waterproofness.
Weight
Of course, nobody wants to hike for miles, up steep inclines, with weights on their feet. Many factors contribute to this including dense outer materials, deep lugs and thick insoles, among others.
There’s no good way to tell if your new shoes will be too heavy for you, other than wearing them. But if the manufacturer provides an accurate weight, this is something to consider before making a purchase. All other factors considered, pick a lightweight option if you plan on long, technical hikes.
North Face had the lightest reported weight in a men’s boot, while New Balance had great reviews from female wearers for its lightweight women’s model.
Which Hiking Boot Should You Choose?
If you’re suffering from flat feet and need the absolute best in arch support, we recommend the Merrell Chameleon 7 Stretch. It’s unrivaled among these brands and models.
However, if you’re having trouble committing to your new hiking hobby, and looking for a decent pair at a low price, you can’t go wrong with the Timberland White Ledge. These 100 percent leather boots look great, feel comfortable, fit any lifestyle and most importantly: they won’t break the bank.
Finally, you may have noticed one brand in particular whose name appeared in almost every category. The Vasque Mantra 2 offers solid arch and ankle support, an advanced footbed and insole, and GoreTex waterproofing. The only drawback is their narrow fit.
Time to Hike
As a wilderness-loving man with fallen arches, I understand the importance of quality, comfortable shoes that can take care of my flat feet during long trail hikes.
If you found this article informative and helpful, please share it with your friends and family, especially those who love hiking and suffer from flat feet. Foot care advice is free and can improve your friends’ lifestyles.
Winter camping is incredible. Snow blankets the trees, coats the ground, and freezes lakes and rivers, turning familiar landscapes into a brand new pristine wonderland to explore. Winter is not a season, it’s a celebration.
The only problem with winter camping is that it generally takes place in winter. And winter, as we know, is not only about having a cozy talk beside the fire— it’s cold and dangerous.
This guide will help you make it a little bit warmer.
Basics (101)
While winter camping is similar to summer camping in many ways, it’s always more hazardous. And the colder it is, the more dangerous it becomes.
Here’s the list of topics to check out before stepping out on a winter trail:
How to choose the proper campsite. The location with the best view is not always the best one. Learn about the other criteria.
How to set up a tent on the snow. Read the instructions for your particular tent. Then check out real-life tips.
How to eat and drink properly. Evidently, camping in winter requires more calories than in summer. How many is “more”? Should you exclude and include any particular foods? Should you boil snow?
Essential winter camping gear. Do you need a paper map if you already have your iPhone? (Yes, you do.)
Dressing properly. Should you just put on everything you find in your wardrobe, or is there any reliable clothing system? What is dressing in layers?
Frost injuries and how to prevent them. Hypothermia and frostbite.
Ice safety. How not to fall through the ice, and how to rescue if you did.
And remember, no guide can replace years of real-life experience, but guides make sure your first backpacking journey won’t be the last one.
Now, let’s break those topics down from the very beginning.
How to Camp in the Snow
The most important thing to remember: building a camp in winter takes more time. Not simply because of the temperature outside but because it requires more planning.
Better planning leads to better decision making that leads to a better experience. When choosing a location to hunker down, follow this checklist to make sure nothing will stop you from having fun on your winter journey:
Daylight hours. There might be a perfect location just over that hill, but do you have enough time to get there? Give yourself at least 2 hours to set up a camp before it gets dark.
Location safety. Steep hills, avalanches, tree hazards, wild animals, and wind are the main factors to take into account. Use terrain features that help you (e.g., forest edges that block the wind), and avoid risky ones (e.g., dangerous slopes).
Privacy. Are you too close to the neighboring camp? Consider moving a bit further.
Water. Melting snow is always an option, but having a frozen lake or a creek nearby makes life easier.
Sunlight exposure. A bit of sunshine in the morning helps you warm up faster and puts a smile on your face.
Distinctive features. A visible landmark helps find your camp in an emergency situation.
In winter, choosing the right spot for your shelter is one half of the battle. Let’s look at the other one.
Setting up a Tent on Snow
When you’ve found the proper location, it’s time to start building your castle. Follow these tips to make your shelter comfortable and secure:
Trample down the snow. Use your skis or snowshoes to stomp out a level spot for your tent. Let the snow harden for 10–20 minutes. This will prevent it from melting and you from sinking into the snow overnight.
Use proper stakes. Standard pegs are no good in winter, especially when it’s windy. Get snow stakes. Or, you can use sticks and branches instead: dig a hole, place a stick in parallel to the ground, cover it with snow, and tread it down with your feet. The key is to place sticks horizontally, creating anchor-like structures.
Dig out a hole in front of the entrance. It will help block cold air from entering your tent, and it provides you with a handy bench and some additional space to store your equipment.
Build walls. Because, what is a castle without a wall? On a more serious note, walls protect you from the wind. Building them is always a good idea unless the weather is extremely snowy (then walls can gather even more snow and make your tent collapse). The ultimate mastery is to isolate your tent with a wall while leaving a gap to vent it and help reduce moisture.
Now, when your overnight shelter is ready, it’s time to talk about ethics.
Leave No Trace
The most crucial part of enjoying wildlife is leaving it as it is—wild. Seemingly “harmless” things can accumulate into a disaster: one negligently discarded cigarette can lead to a massive fire, and a thrown-away empty can might harm an animal and even cost it its life.
Leave No Trace is a set of guidelines that explains how to cause minimal impact on the environment. It comprises seven principles:
Plan ahead and prepare. Not only read the regulations, but also educate yourself about the area you’re headed to. If you’re not allowed to bury your waste products, there might be a good reason for it. Preparation helps reduce your impact and avoid unnecessary risks.
Travel and camp on durable surfaces. Snow is not just lying there for fun, it protects the underlying vegetation. Compressing the snow cover can shorten the growing season or even destroy plants. Do not create new trails when snow is lacking and hunker down on existing campsites. Remember, good campsites are found, not made.
Dispose of waste properly. Little bits of trash add up quickly and take years and years to decompose. What you pack in, you should pack out, even organic waste. If allowed, you may bury human waste, but never bury toilet paper. If possible, cover the cathole with a big rock to prevent animals from digging it out.
Leave what you find. “Take only pictures, leave only footprints” is always a good principle. The best souvenir is your memories of enjoying pristine wildlife.
Minimize campfire impacts. While it’s always safer to avoid using open fires, nothing evokes the magic of overnight camping better than crackling firewood. Once a necessity, it’s now steeped into our tradition. For minimizing impact, use only existing fire rings or stoves.
Respect wildlife. Always store food properly so it doesn’t lure wild animals, and do not ever feed them. Don’t stress them out trying to get a reaction from them, observe wildlife from a reasonable distance.
Be considerate of other visitors. Many people come to the wilderness to enjoy nature. Be quiet and keep pets under control.
Always keep your campsite small—the bigger the site, the bigger the impact. Stay at least 200 feet from any water source to make sure wild animals have free access to water. Never bury feces close to trails, campsites, and water sources.
Learn more about outdoor ethics on the Leave No Trace Center for Outdoor Ethicsofficial page.
Food and Drink Tips for Winter Camping
Planning meals is one of the most exciting things about preparing for camping, isn’t it? But even if not, it’s undoubtedly one of the most important things.
Trekking through snowy glades takes a lot of power, whereas your appetite is oftentimes reduced during such activities. To help you efficiently restore energy, your meals should be tasty, energy-dense, and easy to cook.
Speaking of cooking, you can’t do it without a kitchen.
Building a Winter Kitchen
When setting up your kitchen, remember that it’s not just for cooking—it’s for conversation. Especially during the long winter nights.
Luckily, winter generously provides you with free building material. Tramp down an area for your kitchen and then use a shovel to construct tables, seats, and even walls to shelter yourself from the wind. After you’ve finished building your masterpiece, let the snow set up for about an hour (it might take less time for heavy snow).
As a final touch, cover your cookhouse with a floorless tent. Bravo, compadre, great job. Now it’s time to talk about food.
Caloric Requirements
Before recommending particular meals, let’s talk about energy. And frankly, there’s not much to talk about. There’s only one thing to keep in mind—caloric requirements increase significantly while camping in winter.
For an average winter backpacking adventure, you’ll need roughly twice as many calories as you would normally consume on a lazy summer day.
If you need the exact numbers: 3000–4500 calories a day for women, 4500–6000 for men. In real life, these “exact” numbers will vary based on your age, health, and the intensity of your journey, but you can still use them as a starting point.
Recommendations
Experimenting with your diet while backpacking is the easiest way to add more fun to your winter adventure. Especially when hiking across open plains with no trees around.
The best idea is to stick to your regular eating habits, omitting the least calorie-dense meals. Follow these recommendations:
Pack foods you like. Wilderness has enough surprises, food shouldn’t be one of them.
Avoid foods that contain too much water. Water adds extra weight without boosting nutritional content. Leave fresh fruits and vegetables at home.
Focus on dry foods. Freeze-dried foods are the most efficient option, although pricey. They have up to 99% of their water content removed, significantly lightening your backpack. It’s a good idea to have freeze-dried foods as your emergency nutrition. Other good options are cereals, nuts, and cookies.
Fat is the most efficient fuel. It contains twice as many calories for the same weight as carbs and protein. If your body tolerates fat, pack in cheese, butter, and cured sausages.
Focus on simple meals. Complex dishes take a lot of time to cook and might be good for dinner, but breakfasts and lunches should be as simple as possible. However, this depends on your preference.
Use spices to create variety. They weigh nothing and help turn one dish into several different ones. It saves time and helps you avoid getting bored.
In general, your food reserves should be portable, calorie-dense, and easy to cook. Store everything properly so it doesn’t lure wild animals. Hot meals are great, but do not rely entirely on them. For hot meals, opt for one-pot options. For water, use insulated water bottles with special covers—regular plastic bottles can freeze solid.
Now it’s time to talk about meals.
Meals
A recipe is a story that ends with a good meal. Winter backpacking meals are more like Hemingway’s stories—straightforward, concise, and realistic.
Options are nearly unlimited. However, certain patterns exist:
Breakfast. The mornings are cold and you usually want to start moving ASAP. But you need a complete meal which gives you enough energy for the day. Opt for having a fair mix of carbs, fats, and protein that requires little or no cooking: cheese and salami tortilla roll-ups, instant mashed potatoes with bacon, powdered scrambled eggs with instant hash browns.
If you’re planning to have a hearty lunch, you can opt for energy bars for breakfast. It’s the fastest possible way to start your day.
Lunch. Some backpackers prefer to keep their lunch short. In such a case, opt for quick foods: protein bars, nuts, dried fruits, and sandwiches.
Others like to hunker down and roam around the camp for the rest of the day. In this case, opt for whatever you like: from fast options to hot soups and complex dishes.
Dinner. Nothing is better than sitting by the campfire, enjoying your hot dinner after a long long day. Pack out everything you have in store and create your culinary masterpiece: from pasta with parmesan and bacon to hot spicy ramen with veggies.
Or, if you’re too tired, opt for “just-add-water” options. It’s your adventure and you set the rules, Morty.
While making rules, keep this in mind:
Protein gives long-term satiety. Add protein to every meal.
Vegetables improve your stool. Dehydrated veggies are a must for long-term backpacking unless you plan on digging catholes every other hour.
Simple carbs are the fastest source of fuel. They are ideal when you need short-term bursts of energy.
Too much fat can cause diarrhea. If you’re not used to eating a lot of fatty foods, don’t start doing it on the trail.
Never ignore snacks. Not only because they are convenient and handy, but also because they help you comfort yourself in stressful situations. Even the most enjoyable journeys cause stress, sometimes barely noticeable. A square of chocolate might help you sleep better.
Melting Snow
Covering the outdoors with a thick white blanket, winter freezes lakes and buries creeks, oftentimes making melting snow the only option to get potable water.
Do not eat snow. Even though it doesn’t require purification, it takes too much energy to melt and can easily cause hypothermia.
Do this:
Find an area with clean white snow (pinkish color indicates bacterial growth).
Light a fire or turn on your stove.
Preheat a little bit of water in your container.
Gradually add snow.
Dumping in a huge pile of snow will not only burn the bottom of your pot but also scorch the snow. If you think it sounds ridiculous, you might give it a try—nothing bad will happen except for lousy-tasting water.
Essential Winter Camping Gear
Undoubtedly, having a good head on your shoulders is the most important piece of your winter camping equipment.
And yet, it’s hard to imagine anyone climbing snowy hills without these essential things.
Tent
One-tent-fits-all solutions are rare. Picking out a winter tent is usually a trade-off between livability and weight.
Here’s what you should consider:
3-season tents are lighter, but they can’t resist heavy snow loads and violent winds. If the weather is mild, you can use them for, say, ultralight one-night camping. Otherwise, using them is uncomfortable and dangerous.
4-season tents have more poles and stronger fabrics, hence more weight. They are designed to withstand the most severe weather conditions. Models with rainflys add an extra layer of protection against wind and snow.
Extra space equals extra weight. The ability to keep all your gear inside can cost you several addition pounds of weight on your back.
Ventilation features are also important as they help reduce condensation buildup. The best tents have adjustable vent options.
Backpack
Winter backpacking puts special demands on your backpack:
Capacity. A 50-liter pack is often enough for a weekend trip in summer, and yet it’s almost never enough in winter, even for a single-day trip. The bare minimum is a 60–70 liter pack.
Frame. A backpack for winter camping must have a frame, whether internal or external. Ultralight backpacks are often frameless and thus aren’t suitable for hiking in the snow.
Features. Lash points, daisy chains, and other tool attachment points make it easier to carry additional equipment, and side zippers provide much easier access to whatever you have at the very bottom of your backpack.
Most importantly, your backpack must fit you comfortably. You’ll be carrying it all day long and a pain in your loin is the last thing you dream about.
Sleeping Bag
If you’re new to winter camping, it’s your sleeping bag that defines whether you’ll want to return for your second journey.
When picking out a sleeping bag, keep these criteria in mind:
Temperature rating. Learn about the lowest expected temperature in the area you’re about to visit and choose a bag with an even lower temperature rating. Ideally, with at least a 15 °F gap between those two numbers. After all, if it gets too warm, you can always unzip your bag.
Insulation material. Talking about insulation always boils down to a down-vs-synthetic debate. Down bags pack smaller and are lighter for the same temperature rating, but they lose their warming properties if wet. Synthetic bags are non-allergenic and efficient even if soaked.
Shape. Usually, winter sleeping bags come in two basic shapes: semi-rectangular and mummy. Mummy shaped bags are narrow at the feet, hence warmer because they have less empty space. The downside is that you won’t be able to roll over inside a mummy bag. Semi-rectangular bags are more spacious but less warm.
Rectangular sleeping bags are roomy, but they can be too cold for winter camping.
Sleeping Pad
Using sleeping pads helps isolate your cozy sleeping bag from the icy-cold ground. Here’s how you should do it:
Use more than one pad. Two, and especially three pads, provide much better insulation than just one.
Use different types of pads. Air pads pack small and light and are soft and comfortable. They are mostly designed for summer camping but are still worthy as an additional layer of comfort. Foam pads usually provide good insulation and are cheap and durable. You can use a foam pad as the first insulation layer (closer to the ground) at night and fold it into a sitting pad during the day.
Check R-values. R-value is the number that shows how efficiently the pad insulates; the higher, the better. Winter options start with an R-value of 5, but it can be lower if you use multiple pads.
Don’t be afraid of puncturing an air pad because it’s usually easy to repair with a patch kit. If you want to use just one pad, self-inflating foam pads offer a nice compromise between comfort and insulation.
Stove
Most backpacking stoves come in two forms: canister stoves and liquid-fuel stoves.
Canister Stoves
Their main pros are size and convenience. Some options weigh less than half a pound and pack really small. Lighting them is easy, just open up the valve and use a match. Also, a canister stove might have a burner and a pot included which makes life easier.
The downsides are that you never know for sure how much fuel is left, that in cold weather a canister stove works poorly without a pressure regulator, and that the small size comes at the cost of a shorter fuel supply.
In general, canister stoves are good for one-day hiking trips or one-night camping when not much cooking is involved. In other cases, opt for liquid-fuel stoves.
Liquid-fuel Stoves
These stoves have two major pros: they perform significantly better at high elevations and in cold temperatures, and it’s much easier to tell how much gas is left. Moreover, some of them are multi-fuel, which is useful in international traveling.
However, liquid-fuel stoves have two major downsides: they require periodic maintenance, and most of them require priming. Moreover, they usually weigh more.
Despite their cons, liquid-fuel stoves are much more reliable for long-term winter camping. But no matter which type of stove you choose, these tips will help you avoid emergency situations.
Stove Tips
Aside from your body and your sleeping bag, a stove is the only source of heat you have. In other words, everything about your stove is very important. These tips will help you avoid many stove-related unpleasant situations:
Bring an extra stove. Even a piece of rock can break, not to mention a stove. If you travel alone, consider bringing a small canister stove along with its main liquid-fuel counterpart.
Bring extra fuel. In an emergency situation, a stove can be your only source of potable water until you get rescued.
Before lighting your stove, check it for leaks and damage. If needed, repair it with a multi-tool. You always pack one, don’t you?
Choose the most level surface for your stove. It’s not hard with all that snow and a shovel.
And yes, everyone knows these tips, but it never hurts to revisit them.
Snowshoes, Skis, or Snowboard
Choosing different types of footwear can change your experience drastically, opening new uncharted trails and significantly increasing your speed of movement.
These are the main winter options:
Snowshoes are the most affordable and easy-to-start-with option. Basically, snowshoeing is hiking with poles while leaving bigfoot-sized snow prints.
Skis are definitely the most convenient way to travel long distances. They help you cover more terrain and observe more scenery.
Snowboards are fun for sliding down the powdery slopes, but they make it impossible to travel horizontally. Luckily, splitboards give you the best of both worlds: their movable bindings allow you to easily transform them into skis and back.
Arguably, the best possible combo is to have snowshoes paired with a splitboard. A decent backpack won’t make it feel like a burden to carry all that stuff. Moreover, you can always opt to use a sled.
Sled
If the trail properties allow you to pull a sled, it’s the perfect option to reduce weight on your shoulders and carry more equipment at the same time.
Remember to attach sled poles to carabiners on your hipbelt (or whichever harness you have) in a criss-cross manner—this prevents the poles from flopping around too much. When crossing the poles, secure them at the center with a cord.
Avalanche Equipment
Travelling in avalanche areas requires serious knowledge about avalanche safety. Before stepping on dangerous trails, educate yourself as much as possible. Many locations offer free Avalanche Awareness courses, you can google them.
But even if you don’t plan on traveling across dangerous terrain, these three items might be useful just in case:
Avalanche sufferer’s transceiver. It helps find an approximate location of a person buried under snow.
Snow probe. It’s used to study snow to discover the exact location of a buried person.
Rescue shovel. It helps dig out an avalanche victim.
Oftentimes these things are marketed collectively as a safety set, which doesn’t take much space and weighs little.
Winter Camping Checklist (Ten Essentials)
Camping is all about fun, but there’s no fun when something goes wrong. Especially when it’s freezing cold outside.
First established nearly a century ago by The Mountaineers, the ten essentials have evolved into a system that helps you hold out when something doesn’t go as planned.
The winter camping version looks like this:
Navigation. Phones and power banks can discharge. The bare minimum is a paper map in a waterproof case and a magnetic compass. Optionally, pack an emergency locator beacon.
Sun protection. Sunscreen and sunglasses are just as important in winter as in summer.
Insulation. Check out the how to dress for winter camping section below.
Illumination. LED lamps, spare LED lamps, batteries, extra batteries.
First-aid supplies. The more, the better.
Fire. Stove (must-have in winter), lighters, matches in a waterproof case.
Repair kits and tools. A decent multi-tool with pliers and screwdrivers, silver duct tape, a shovel, cable ties.
Extra nutrition. Bring extra food for at least one additional day for short-term journeys; for longer adventures, bring more. Additional food must require no cooking and be light but energy-dense: bars, nuts, cheese, jerky, etc.
Hydration. Lack of potable water is usually not the biggest problem in snowy landscapes. However, turning snow into liquid is energy-consuming. Make sure you bring enough energy, either as fire or as calories. In emergency situations, your body may become your stove.
Emergency shelter. Setting up a tent is barely possible with a sprained ankle, not to mention that your tent is useless when it’s left at the camp. An emergency reflective blanket or a compact sleeping sack are good additional options.
Don’t forget about signaling devices: whistles, laser pointers, and flares. Water purification tablets and an ice axe might also come in handy.
And remember: it’s better to have, and not need, than to need, and not have.
How to Dress for Winter Camping and Hiking
Along with picking a tent and a sleeping bag, choosing the right clothing is one of the three pillars of safe and sound winter camping.
It starts with the layer principle.
Layered Clothing
Choosing layers is art, surrounded by tried-and-tested-for-decades science of picking the right clothing materials.
Over the years, science knows that these three layers work best:
Base layer. This layer’s job is to manage moisture, wicking sweat off of your skin. The best materials for winter are midweight or heavyweight polyester and merino wool. Both wicking, the former is more durable whereas the latter excels at odor retention.
Middle layer. This layer’s job is to insulate you. The rule of thumb here is the thicker, the warmer. The best fabrics are heavyweight fleece, down, and synthetics.
Shell layer. This layer’s job is to save you from rain, snow, and wind. Arguably, this layer is the most important one—if it gets penetrated, you’re in serious trouble. The best materials are synthetics that provide a nice mix of resistance to water and breathability. The pricier, the better.
Follow this layering principle and you will never feel cold. Moreover, the layering principle helps you add and shed layers if needed.
Speaking of layers, your feet have their own shell layer, called footwear.
Footwear
Traditional hiking boots are only good for early and late season, when encountering deep snow is even less likely than meeting a grizzly bear.
In all other cases, your choices are insulated and waterproof winter boots, bar none. They must be big enough to fit several socks. The pricier, the better—good boots are your everything, even when hiking on a budget. Skimping on boots is forbidden.
Don’t forget about gaiters. They provide additional snow protection and add one more layer of insulation.
Accessories
Likewise, skimping on minor things might cause major troubles. These things include:
Socks. The layer principle applies to socks as well. Opt for a synthetic base layer to wick moisture and for whichever fabrics you prefer for the second layer, except for cotton. Cotton socks are banned when camping in winter. As for thickness, your socks should be thick enough to provide insulation and thin enough to fit into your boots without causing discomfort.
Sunglasses and goggles. Winter can bring many surprises, from severe sunshine to brutal snowstorms.
Winter hat. In mild weather, covering your ears is enough. As the weather gets tougher, a balaclava becomes more useful.
Mittens and gloves. Because your fingers share one room, mittens are warmer than gloves. But sometimes you need more dexterity, hence gloves are also a must. The best idea is to take both of them with you.
Blanket. If you need extra warmth during a cold evening having a wool blanket can make a difference between a miserable and cozy night.
Speaking of major troubles—on a winter trail, idiot strings are more relevant than ever.
Preventing Injuries
Traveling in winter can be life threatening. The two major concerns are hypothermia and frostbite. The former occurs when your body produces heat slower than it loses it, and the latter is caused by freezing tissues.
Preventing them is easy when you follow these rules:
Keep yourself warm. Avoid getting too cold and too hot. If you keep fluctuating between these two extremes, then you should pick better clothing.
Don’t be a tough guy/girl. It’s much smarter to prevent difficult situations than to deal with them. If you start getting cold, stop and do something to fix it before it’s too late.
Watch you group. Observe each of the members from time to time and don’t let them be tough either.
If you follow these guidelines, nothing will happen to you and your group. Nevertheless, if frostbite or hypothermia happens, you will have to rewarm.
How to Rewarm After Cold Injuries
No matter whether you’re rewarming after frostbite or hypothermia, the most important rule is to do it gradually.
Rewarming after hypothermia:
Put on dry clothes and insulate the body. Use multiple layers—the key is to reduce heat loss to a minimum.
Drink sugar water. Carbs in liquid form are absorbed the fastest and help your body rewarm internally.
Apply heat to major arteries. Put hot water bottles at the groin, armpits, and the neck.
Do not rewarm your limbs—this will send colder blood from your extremities to your core, which is dangerous and can lead to death in severe hypothermia cases.
Rewarming after frostbite:
Do not rub tissues, it might damage frozen tissue cells and result in tissue death.
Superficial frostbite can be rewarmed by placing the affected area on a warmer body part.
To rewarm deeper frostbite, immerse the affected area into a water bath. Maintain 105–110 °F, otherwise hotter water will cause additional damage.
Rewarming in a water bath will take roughly 30 minutes. Once rewarmed, apply a gauze bandage and protect the body part from movement and getting cold.
If you can’t protect it from getting cold, it’s sometimes better not to rewarm it at all. Freezing causes major damage, and refreezing after rewarming will result in even more damage. In this case, you should stop your journey and seek help as soon as possible.
Winter Camping Tips
Staying warm, clean, and sheltered is key to successful camping. These tips will help you enjoy your journey even more:
Prepare. You always leave something at home, don’t you? As corny as it sounds, make a list of everything to pack in.
Get warm before bed. Hot drinks could help, but the most efficient way is to combine them with physical exercise. Do some squats and jumps, or just have a little snowball fight. Don’t go overboard—get into your sack before starting to sweat.
Prepare hot water in the evening and put it into your sleeping bag. Not only will it help keep your sack warmer, but it will also provide you with warm potable water in the morning when time is money.
Dry your clothes. If your socks become wet (and they will), use your body temperature to dry them overnight. Or, even better, pull them down over a bottle of hot water. You’ve prepared it before going to bed anyway, haven’t you?
Change thermals. Putting on new thermals for sleep is essential unless you want to make people stay as far as possible from you. Basic hygiene standards do not vanish on the trail. Moreover, experienced backpackers say new thermals make your dreams a little bit warmer.
Isolate the inner layer of socks. If you use two or more layers of socks while sleeping, put on a plastic bag in between layers. It will help keep moisture away from outer layers and will prevent you from changing your entire Gucci socks collection in the morning.
Vent your tent. Condensation build-up is one of the biggest winter camping issues. Air your sleeping bag whenever possible, keep snow away from the inside, and place your tent in parallel to the wind to create some airflow.
Improvise. In extreme situations, everything could help. If you’re forced to sleep in the open air, put spruce branches under your sleeping pad for more insulation.
Ice Safety and Rescue
There’s no such thing as safe ice.
When walking on frozen water, remember—a single careless step can be the last one. Obligatorily, before crossing lakes and rivers, learn the basics of ice safety:
Ice is fickle. Don’t blindly trust the ice you’ve already crossed. It can be weakened by sunlight or deformed by trapped water in a matter of hours.
Spread the group. If the ice can hold your weight, it doesn’t mean it won’t break if your friend comes closer to you.
Check the ice before taking a step. The lead person in your file should poke the ice with a ski pole. Thick and thin ice will sound and react differently.
Don’t step on ice you don’t trust. Opt for roundabout trails, especially if you travel alone.
You should always be cautious. Nevertheless, even the most experienced hikers can fall through the ice. For your own safety, you should learn how to rescue yourself and your group.
Rescuing yourself:
At first, calm down. Keep your head above water and steady your breathing. Cold water shock and hyperventilation will stop in about a minute.
Turn into the direction you came from: at least you know the ice is safe there.
Use your arms to pull as much of your body out of the water and kick your legs up to get yourself into a level position.
Keep working yourself up by kicking your legs and pulling with your arms. Even though it might be challenging because the ice is slippery and/or keeps breaking, you’ll get out of there eventually as you reach thicker ice.
Once you’re up, roll away. Do not stand up until you’re completely sure the ice is thick enough.
Rescuing a group: most importantly, minimize panic. Then follow the steps mentioned above, one person at a time. If any of the members of your group are left on ice, they can throw you a rope or something else you could grab. Then you can form a human chain by grabbing the ankles of the person in front.
Never approach the ice hole on your feet, spread your weight as wide as possible. This will minimize the chance of ice giving way. Learning about ice thickness will help you, too.
Ice Thickness
In general, two types of ice exist. The first type, black ice, often forms on lakes and ponds when the wind is calm. In fact, it’s not black but transparent—it’s the water below that makes it look black. This type of ice is stronger than the second one, white ice.
White ice appears when snow accumulates atop black ice and pushes it down, thus pushing the water up. These forces produce cracks on black ice, letting the water out. Then the water mixes with snow, creating slush. As it freezes, white ice appears.
White ice is weaker than black ice because it has more air trapped in its structure. It’s less dense, hence easier to break. A fun fact—white ice itself is also transparent, it’s trapped air that is responsible for the color.
Even though black ice is stronger, it doesn’t mean it can easily hold your weight. Use this ice thickness scale to assess its strength:
2” or less. Stay away.
3”. It might hold one person.
4”. Suitable for ice skating and fishing.
5-6”. ATVs and snowmobiles.
8”+. Cars.
12”+. Medium trucks.
Tip: for measuring ice thickness, cut a hole with an ice-axe and then use calipers. If walking across icy lakes is part of your backpacking adventures, they are an absolute must for you.
But even the most expensive gear doesn’t release you from learning how to select routes properly.
Selecting Routes
The general rule is that ice is usually thinner in running water, and the greater the speed of the current, the thinner the ice. The speed can vary even within the same water basin, creating areas with different ice strength.
Many other factors can tell you about ice thickness. These guidelines will help you select better routes:
Rivers: bends, rapids, and constricted sections are at the most risk. Avoid crossing them whenever possible.
Lakes: the thinnest ice is at the spots where rivers enter and exit a lake.
Plants like cattail impair ice structure and hence its thickness. Basically, anything that sticks out of the water (rocks, logs, plants) weakens the ice around it.
Undercurrents are difficult or even impossible to notice with the naked eye. Test the ice from time to time and change your route if needed.
Honeycombed ice is unpredictable. Stay away from it.
Slushy snow, water on top of ice, dark patches, and anything that disrupts a uniform texture on the surface is a danger sign.
Other things to take into account: sun exposure, the depth of the basin (the deeper, the better), the weather, and even your weight. Listen to your common sense and avoid doing anything you’re not sure about.
Backpacking in Snow
Winter is a wonderful time. As snow blankets the landscape, you immediately launch into these dreams of building a snow cave, skiing across frozen lakes, and discovering new picturesque trails.
But unlike summer camping, the price of a mistake in winter might be too high. That’s why all that expensive gear and all these backpacking guides exist—they help reduce the likelihood of making a bad decision and mitigate the effect of making wrong steps.
Hopefully, this guide has helped you learn something new or revise something that you might have forgotten. Add it to your bookmarks and reread it next year before opening a new winter backpacking season.
Who knows, maybe by that time it will double in size. And remember, winter is beautiful but dangerous, no matter how experienced you are.