How to Use a Compass: The Ten-Minute Guide
Using a compass is easy. The needle points to the north, and so does your map. Just put one atop the other and you’ll get all the bearings you need. A cinch, right?
It is, except that such calculations are incorrect. If you do so when hiking around Seattle or New York, you’ll be a quarter-mile off your course for every mile traveled.
The solution? Learn how to use a compass properly. This guide will explain to you how to set up magnetic declination, locate your position on a map, and take bearings.
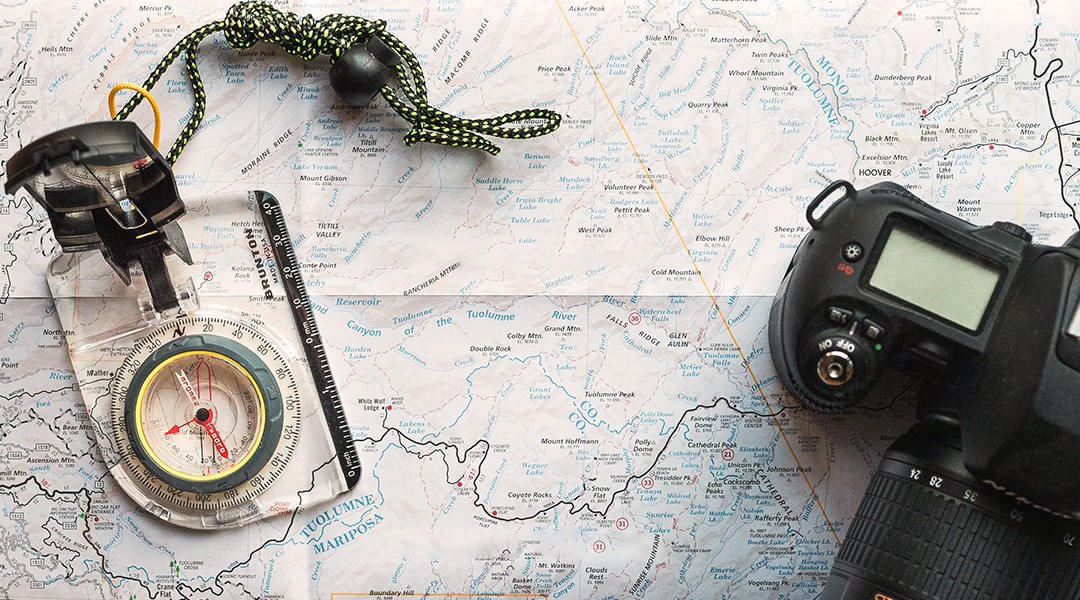
(And if you don’t have a magnetic compass yet, you should get one—it is a crucial part of the Ten Essentials__.)
Let’s dive right in.
https://www.youtube.com/watch?v=0cF0ovA3FtY&
Compass 101: The Anatomy
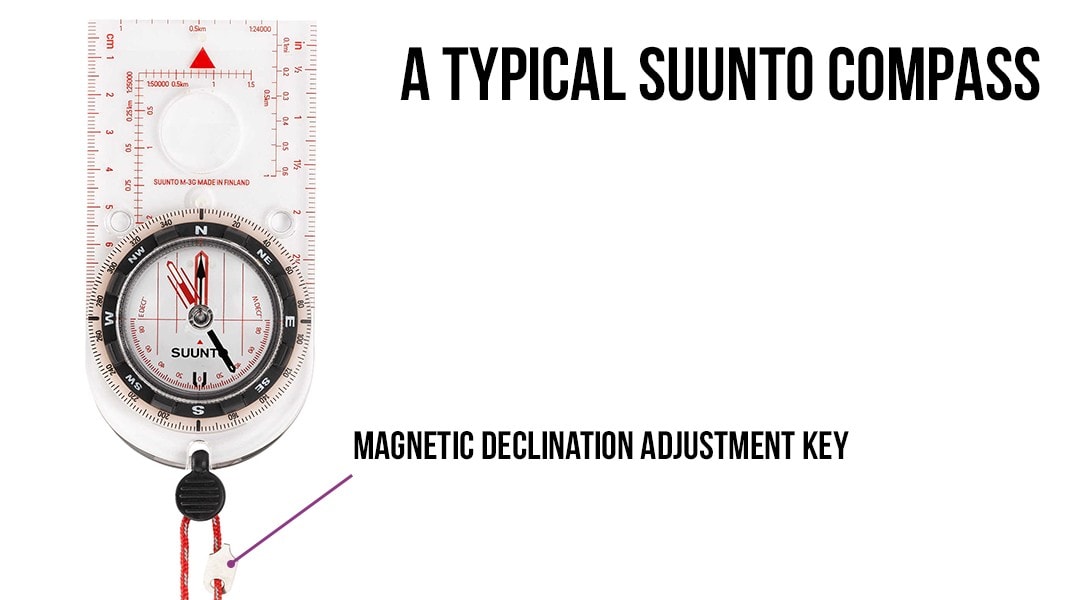
For the purpose of this guide, we’re dissecting one of the most popular magnetic compasses on the market:

Baseplate - must be transparent so you can see the map below, and have at least one straight edge for drawing lines and calculating azimuths.
Direction-of-travel arrow - as the name suggests, shows you where exactly you should go after taking a bearing.
Rulers - handy to calculate distances using the scale on your map.
Compass housing - where all the magic happens. Let’s look a bit closer:
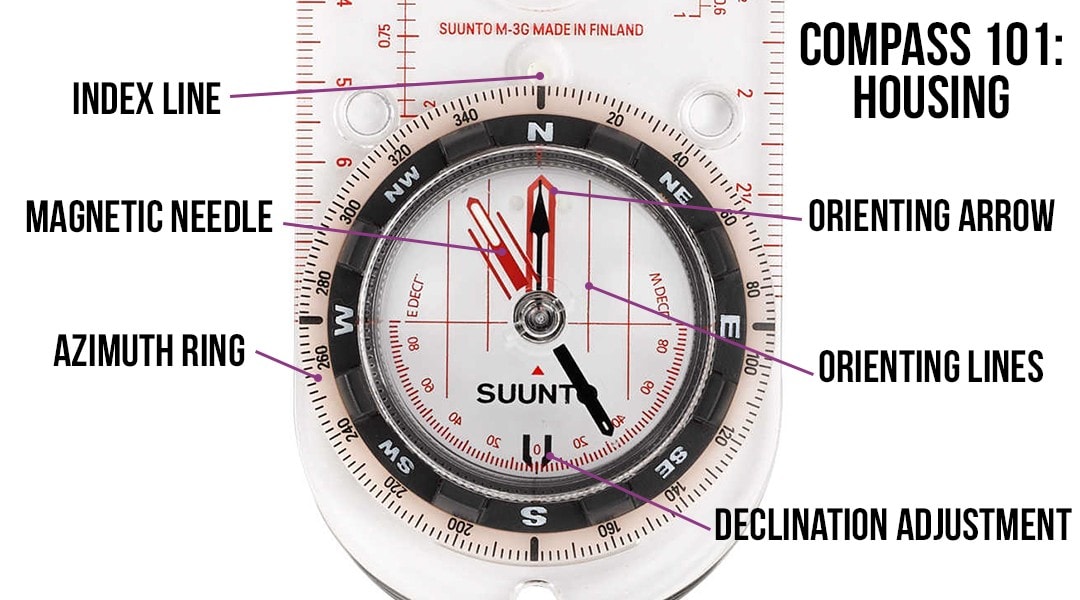
Index line - a little marker that gives you bearings.
Azimuth ring - aka rotating bezel, is a swiveling 360-degree azimuth scale (azimuths and bearings are essentially synonyms, we’ll explain it later).
Magnetic needle - usually red, shows you the direction of the north.
Declination adjustment - a marker that tells you when to stop rotating the declination adjustment key (which comes attached to a compass’s lanyard).
Orienting arrow - also red, is used to orient your compass after calculating a bearing. If your compass doesn’t allow you to set up magnetic declination, this arrow will be in parallel with the orienting lines.
Orienting lines - a grid that rotates along with the bezel. When taking bearings, you will align this grid with the vertical lines on your map.
Step 1: Adjust Compass Declination
Everyone knows that a compass needle points to the north, but in reality two “norths” exist. The north on your map is actually called the geographical or the true north, and the compass needle points to the north magnetic pole, aka the magnetic north.
The true north is unmoving, but the magnetic north isn’t. Since its first discovery in the 19th century, the magnetic north has traveled above a thousand miles and is now moving towards Siberia at nearly 25 miles per year.
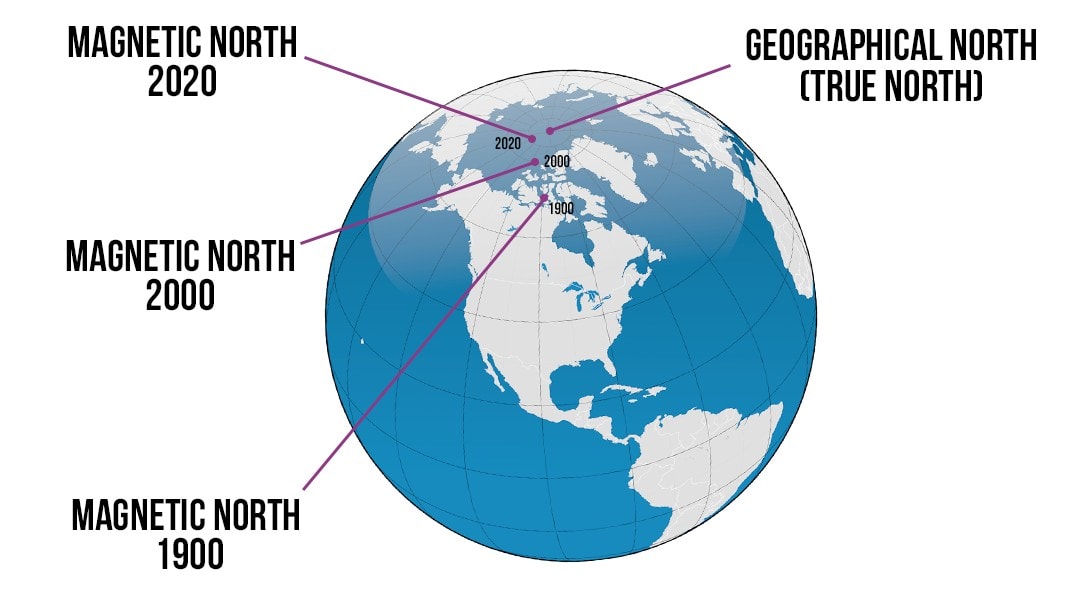
If you draw two lines, both beginning from your current location, one to the true north and the other to the magnetic north—the angle between them will be the magnetic declination.

In the U.S., magnetic declinations vary from roughly 15.6 degrees east in Seattle to 14.4 degrees west in Boston, and even more at the very edges of the continent.
If your compass doesn’t allow you to adjust for declination, get a new one that does. In practice, not adjusting for 15.6 degrees of declination will result in 27 feet of error per every 100 feet traveled. After walking 5 miles, you’ll be 1.4 miles off your destination.
Getting the magnetic declination value for a particular area is easy, you can just google it. It’s often listed on paper maps of the area, too.
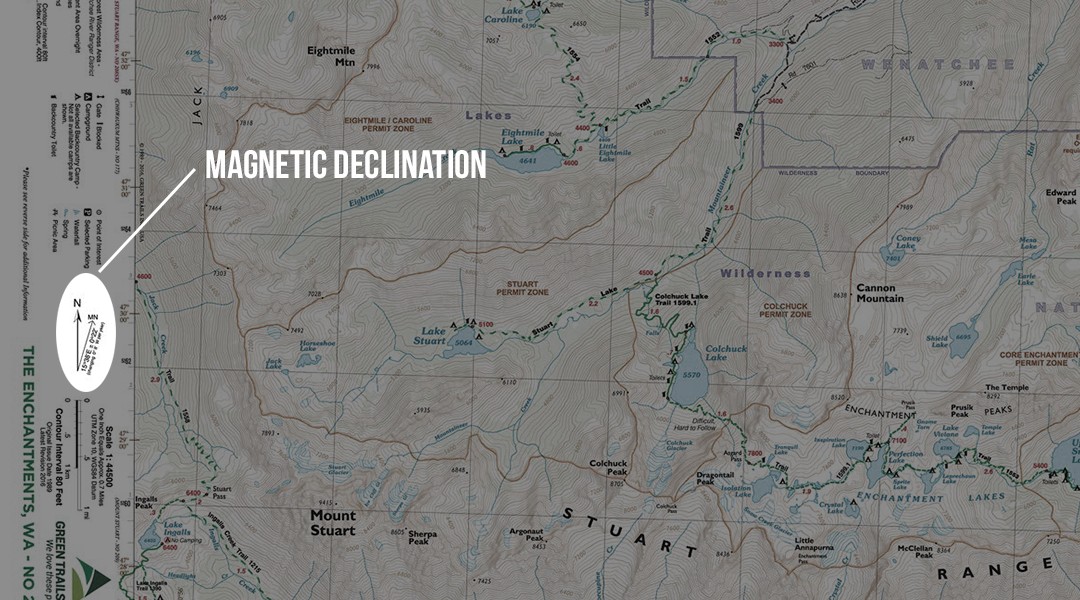
Remember that the magnetic north pole keeps moving, so your paper map should be up to date. If it’s not, always check the magnetic declination on the internet.
The declination adjustment process varies for different compasses. For example, Suunto compasses usually come with an adjustment key attached to the lanyard: you just put the key into the adjustment screw on the back of a compass and crank it until the declination adjustment mark points to the value listed on your map.
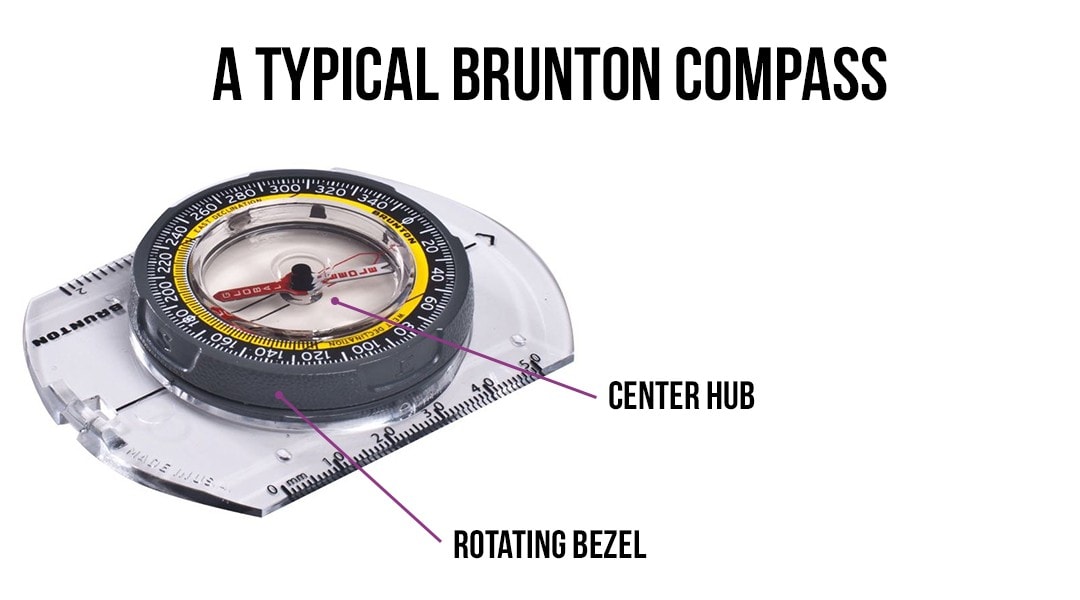
Brunton compasses often require no adjustment tools. You just need to firmly press the center hub with one hand and rotate it to set the desired declination value, while holding the rotating bezel using your other hand.
These two brands are the most popular ones. Other compasses might have different adjustment mechanisms, so you’ll need to do as the instructions say.
Step 2: Find Your Current Location on a Map
Matching what you see in real life with what you see on the map is the basics of using a topographic map, and it starts with finding your exact location.
Sometimes it’s easy: when next to a distinctive landmark, you can just guess it. But things get more complicated when the closest landmark is miles away.
Here’s what you should do in this case:
- Make sure you’ve adjusted the magnetic declination on your compass.
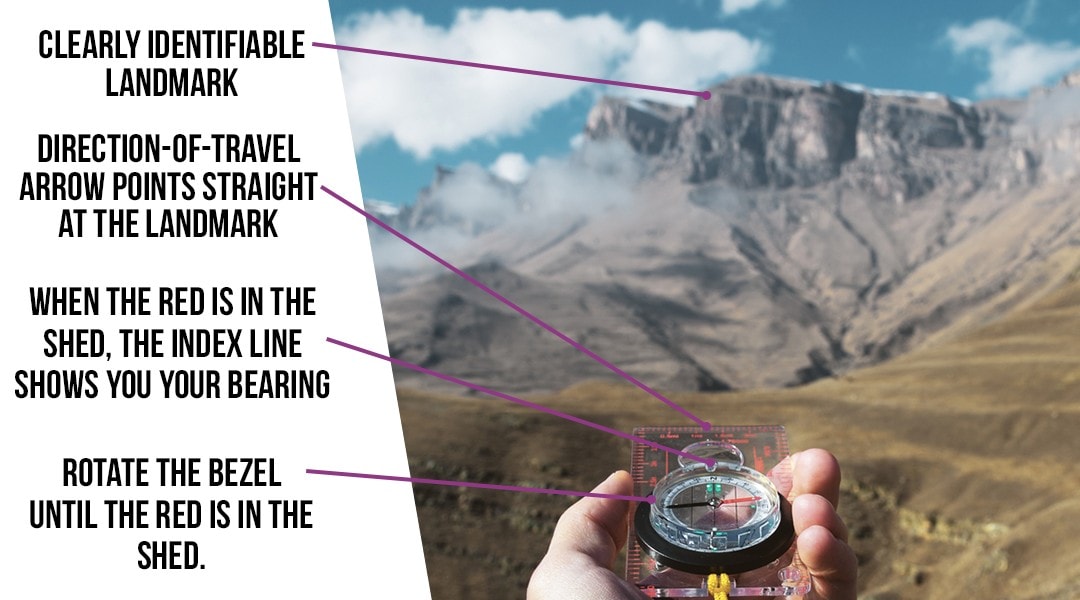
- Find the most distinctive landmark around you.
- Hold the compass horizontally and so the direction-of-travel arrow points straight at the landmark.
- Rotate the azimuth ring until the magnetic needle covers the orienting arrow. This position is also called “red in the shed.”
- Look at the index line to get a bearing.
Now transfer the bearing to your map:
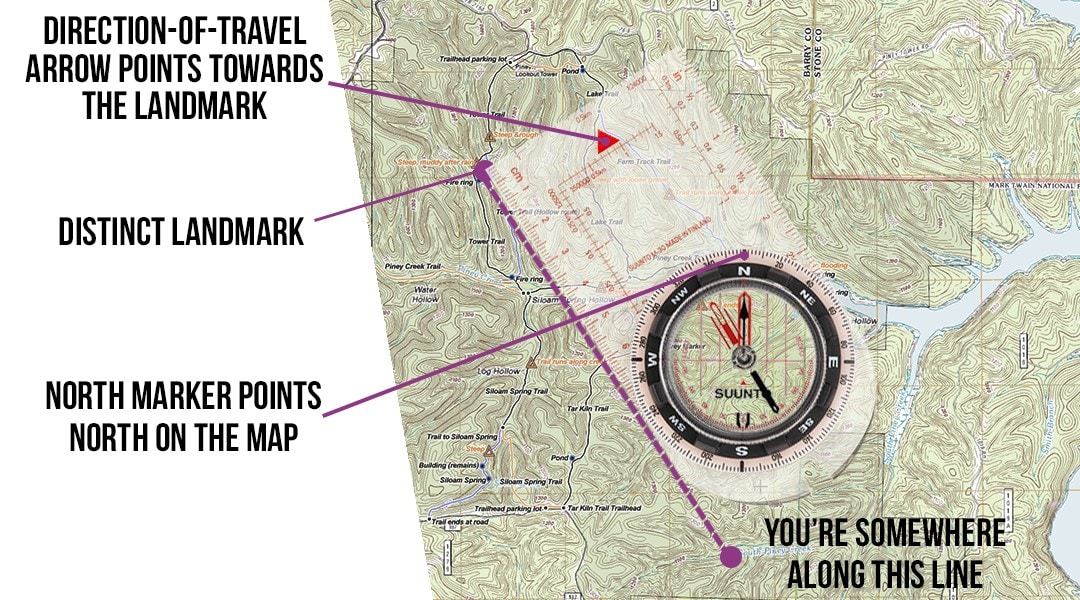
- Find that exact landmark on the map, and lay your compass so the landmark is at the edge of the straight side of the baseplate, and the direction-of-travel arrow points towards it. Towards means that you should still have at least a vague idea about your approximate whereabouts. The arrow mustn’t be pointing upside down.
- Imagine that the landmark on the map is the axis, and rotate the entire baseplate around it until the north mark on the bezel points to the north on the map, and the orienting lines are in parallel with the meridians (lines on the map that run north and south). Do not rotate the bezel alone.
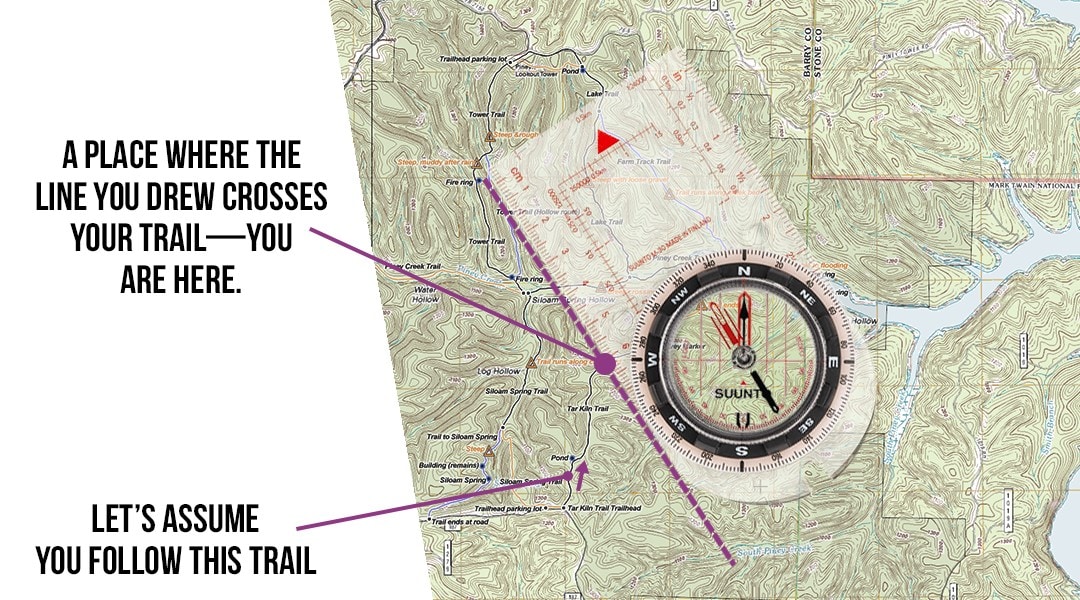
- Draw a line along the straight edge of the baseplate, starting from the landmark. If you didn’t make a major miscalculation, you’re somewhere along this line.
Knowing that you’re somewhere along the line can help you figure out your exact location using other landmarks near you. For example, your trail—you’re around the point where the line you drew crosses the trail.
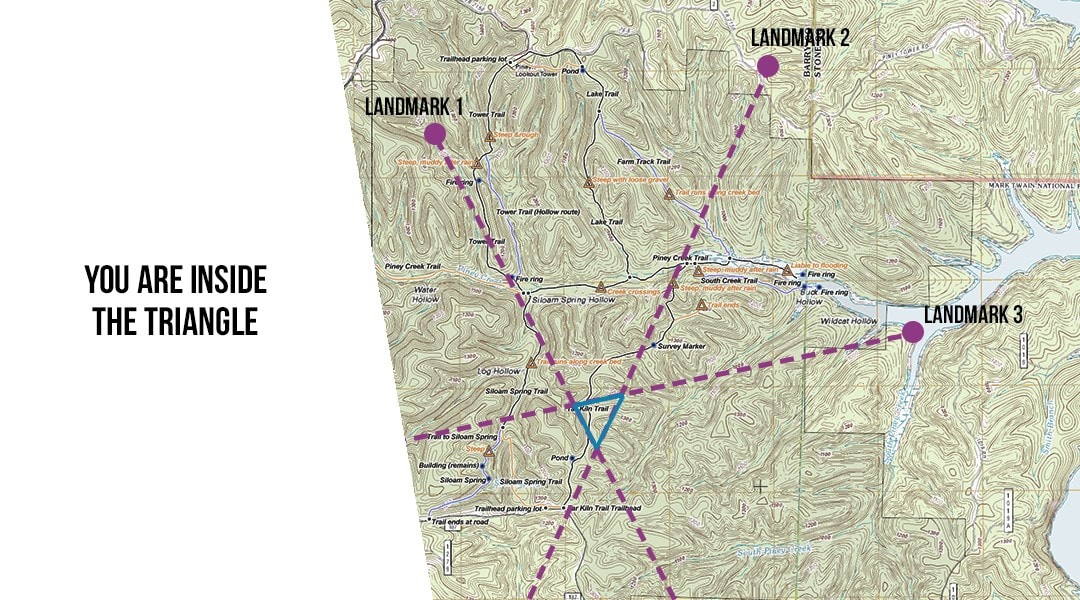
If you’re off the trail and don’t have any distinct landmarks near you, then find a remote landmark and repeat the entire process described above. You’ll get a second line, and your location is somewhere around the point where the two lines intersect.
If you repeat the process for the third time, you’ll get a triangle, and your current location is within it. This method of pinpointing your location is called triangulation; it’s quite precise, because the first two lines alone are often enough, and the third one is used to verify the first two.
Remember that the landmarks you choose should be at least 50–60 degrees away from each other; otherwise, your calculations will be less precise. Oftentimes you don’t need the third landmark if the first two have around 90 degrees between them.
Step 3: Take a Bearing
By this step, you already know where you are and where you want to be. To get there, you need to know a bearing. Essentially, a bearing is just a bit more geographically accurate way to say “go over there.”
There are two important things to know about bearings:
Bearings are based on your current location. If your friend heads to the exact same area as you do, but comes from a different place, his bearing is different. If you blindly follow his bearing, you’ll go astray.
Consequently, you need to know your location on the map to get a bearing. If you don’t, roll back to step two.
This is how you take a bearing:
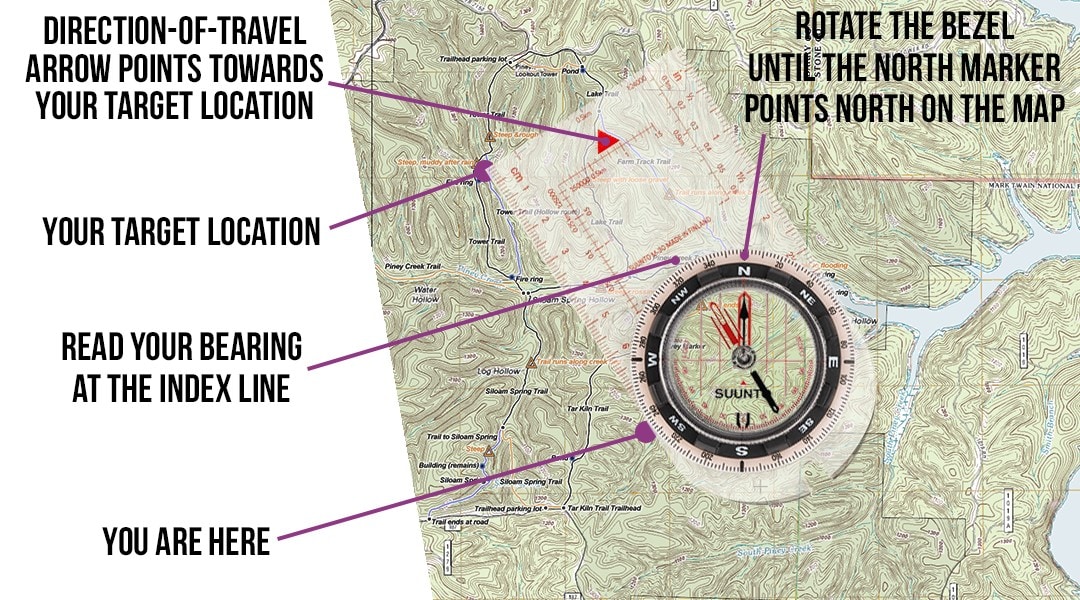
- Take a map and find your current location and your desired location. Mark them (optionally).
- Lay your compass on the map so the straight edge of the compass creates a line between these two marks. The direction-of-travel arrow must point towards your target location.
- Rotate the azimuth ring until the north marker points towards the north on the map, and the orienting lines are in parallel with the meridians (vertical lines on your map).
- The index line shows you your bearing.
Now it’s time to follow the bearing. Put away the map and grab your compass. Make sure the bezel no longer rotates: until you take another bearing, the index line should always point to the bearing you took before.
(It’s not a big deal if you accidentally whirl the bezel, just rotate it back so the index line shows the bearing you need. Once you’ve calculated it, you don’t need to unpack your map again.)
Hold the compass flat in front of you, the direction-of-travel arrow pointing ahead, and revolve your whole body until the magnetic needle aligns with the orienting arrow, or the red is in the shed.
Once it is, you’re facing your bearing. Have a nice walk!
Common Mistakes When Using a Compass
Using a compass is not the easiest thing, especially in the beginning. Here are the most common mistakes:
- To think that the black arrow points to the north. It doesn’t, the red needle does. Moreover, the black arrow doesn’t even point accurately towards the south because the south magnetic pole is not antipodal to its north counterpart.
- To confuse the magnetic north with the true north. The magnetic needle points towards the magnetic north pole, which keeps moving towards Russia at 25 miles per year. To find the true north, you need to set up your magnetic declination.
- To forget about local magnetic attractions. The Earth’s magnetic field drives your compass’ magnetic arrow to move, but so does any magnetic metal such as iron and nickel.
- Not checking where the north is on the map. This might sound surprising, but some maps do not have north located on top.
- Locating the direction-of-travel arrow upside down when taking bearings. If you plan to go from A to B on the map, this arrow should also point from A to B when you’re calculating bearings.
Aside from these mistakes, sometimes people are simply not accurate enough when taking measurements. Remember that small errors can accumulate into a large miscalculation.
So large that you might need some compass tips.
Compass Tips for Beginners
The most important tip is to practice using a compass before stepping onto the trail. Frankly, this isn’t even a tip but common sense. And here are the tips:
- Trust your compass. If you don’t carry a brick of magnetic metal in your backpack, your compass is most likely giving you the right azimuth.
- Don’t go hardcore. Using a triangulation method makes very little sense if you’re standing right beside a distinctive landmark.
- Go hardcore. When finding your current location with a compass, hold it up to your eye to make your calculations more accurate (it’s even better to use a compass with a sighting mirror).
- Follow the direction-of-travel arrow. It has its name for a reason. The only situation when you can follow the red needle directly is when your bearing is equal to the magnetic declination of the area, which is, basically, never.
By the way, we keep speaking about bearings and azimuths without actually explaining what they are. Let’s fix this.
Nerd Den: Azimuths vs Bearings vs Headings vs Courses
The simple truth is that all of them are synonyms to a degree. On a casual hike, the difference doesn’t even matter.
However, in an emergency situation, the difference might be important. If you’re communicating with a rescue crew and they ask you for an azimuth, but you give them a bearing, it might be quite confusing.
Now, it’s time to clarify everything.
An azimuth is your direction on a 360-degree scale and is represented in relation to north. It is always measured clockwise. When you rotate the bezel, a number under the index line is actually an azimuth but not a bearing.
An azimuth can be any number between 0 and 360.
A bearing is an azimuth that is represented in relation to the cardinal directions. A bearing is always an acute angle, less than 90 degrees. A bearing of 135 degrees doesn’t exist.
Bearings are measured from north or south first, and then towards east or west. Here are some azimuths converted into bearings:
- An azimuth of 45 degrees is an N45ºE bearing, it points to the north-east.
- An azimuth of 160 degrees is an S20ºE bearing, it points to the south-east.
- An azimuth of 230 degrees is an S50ºW bearing, it points to the south-west.
- An azimuth of 350 degrees is an N10ºW bearing, it points to the north-west.
When somebody gives you a bearing of 135 degrees, what he really means is an azimuth of 135 degrees.
Heading and course are basically equal, the only real difference is that the word course is more often used in air travel.
Simply speaking, in the world of hiking, your azimuth or bearing is the direction you want to go, and your heading or course is the direction you’re temporarily forced to go because of obstacles.
Essentially, you don’t need to know all this if you’re just going on a regular hike. That’s why this section is called “Nerd Den.” But sometimes it doesn’t hurt to know something extra.
This video will nerd you up a notch:
https://www.youtube.com/watch?v=\_s\_L2iz8r7U
The Bottom Line
Nobody is perfect. An Italian explorer once made a mistake when seeking Asia and ended up reopening the Americas.
Using a compass is not that challenging, but you should at least learn how to adjust your compass for magnetic declination. Because you don’t want to end up petting bruins in the Siberian taiga, do you?
Now that you know how to go old-school in navigation, check out our winter camping guide!